Jul 122015
 

There’s a fast food company that has recently promoted their newest menu item - a sandwich which includes guacamole - by saying one reason to put guacamole on the sandwich is because “it’s just really fun to say… ‘guacamole'”! You know what? They are absolutely right. “Guacamole” IS fun to say, but it’s WAY more fun to eat! Here’s all you need to know about how to make your own Guacamole.

Jan 142015
 

How’s your basic cooking knowledge?

Well, if you’re reading this at all, I know you at least have an interest in cooking (or perhaps just eating - that means you, Dad!). Cooking is something that so many people do, but often out of necessity, rather than because they are passionate about the art. It’s also something for which the vast majority of people do not receive any training, other than watching their parents cook. But what if your parents were not big cooks? What if you just had to learn as you go? Sometimes you miss the critical points, the basic techniques that can make a big difference to your overall effectiveness as a cook.

That’s where the Basics comes into play. Starting today and every Wednesday you’ll be able to see a new Basic episode (or two!), showing you how to do one cooking technique properly. Today we’re launching two segments - how to cook pasta and how to make a marinara sauce. Already a pro? Well, watch it anyway - you never know when you might learn something new! Remember: the more you know, the more you know you don’t know! 😉

I hope you enjoy the segments. They were a lot of fun to make and they let me do what I love doing best - teaching people! If you like the segment, be sure to click “Like” and subscribe to the series. So, without further ado… let’s get BASIC!

Nov 272014
 

Today’s the day! Happy Thanksgiving! From years of teaching Thanksgiving classes to home cooks, I’ve learned that one of the biggest fears of the day (aside from under-cooking or over-cooking the turkey) is making the gravy. This doesn’t need to be intimidating and you can actually make the gravy ahead of time while the turkey is cooking, finishing it at the end with the drippings. Here’s a little video to help.

Basic Gravy
Makes 2 cups

Ingredients:
2 tablespoon butter
2 tablespoon flour
1 to 2 cups stock (chicken, beef or mushroom), room temperature
salt and freshly ground black pepper
Other optional seasonings (soy sauce, herbs, cream)

Directions:
1. Pre-heat a 2-quart saucepan on medium heat.
2. Add butter and melt. Add flour and whisk butter and flour together. Cook, stirring regularly for 2 minutes.
3. Add 1 cup of stock, whisking constantly.
4. Bring the mixture to a boil and thicken it. Set it aside.
5. When you have finished roasting your meat, pour the drippings from the roast into a fat separator. Let the fat rise to the surface and pour the flavorful drippings into the gravy. This will dilute the gravy to the right consistency and add the flavor from the roast to your gravy. If you want the gravy a little looser, add the remainder of your stock.
6. Season to taste with salt, pepper and Worcestershire sauce

Sep 232014
 

sliced chicken breast on a white plate with greens in background and tomato balsamic sauce on top


Making a pan sauce is one of my favorite things to do when I’m cooking. It’s quick, easy, delicious and finishes off the dish nicely. Plus, it forces you to let the meat rest while you make the sauce, and letting the meat rest is so important to keep it juicy and moist. But wait… there’s more… making a pan sauce is like doing half the dishes - by deglazing, you clean off the bottom of the pan as you incorporate all those tasty brown bits into the sauce AND making the sauce doesn’t make a second pan dirty. It’s a win-win-win-win!

Need a little tutorial on making a pan sauce once you’ve finished cooking your steak, chicken, pork or fish? It’s super easy. You just need to remember three (or maybe four) things:

  • Add Flavor: You start by adding some onion, shallots, garlic, and/or herbs to give the sauce some flavor.
  • Add Liquid or something acidic: This will be the main flavor of the sauce - wine, stock, juice, tomatoes
  • Let it Reduce: The flavors need time to concentrate and blend and the sauce needs to thicken slightly, so let the mixture simmer and reduce for 2 or 3 minutes, or until you feel it looks and tastes right.
  • Finish the Seasoning: After you taste it above, you might think it’s perfect or you might think it needs something - a pinch of salt, a nub of butter to mellow it all, a squeeze of lemon to brighten it. Season it up and serve it!

Here’s a 10-minute lesson on making a pan sauce:


Chicken Breasts with Tomato Balsamic Sauce

Serves 4

Ingredients:

  • 4 (6-ounce) chicken breasts
  • salt and freshly ground black pepper
  • olive oil
  • 2 shallots, thinly sliced
  • 1 clove garlic, smashed
  • ¼ cup balsamic vinegar
  • 2 cups cherry tomatoes, quartered (or chopped fresh tomatoes)
  • ¼ cup chopped fresh parsley or basil leaves

Directions:

  1. Pre-heat a large non-stick skillet over medium-high heat and season the chicken with salt and pepper. Add olive oil to the skillet and sear the chicken breasts, cooking for about 3 to 5 minutes on each side (depending on thickness), or until firm to the touch. Remove from the skillet and set aside.
  2. Add the shallot and garlic to the skillet and cook for two minutes. Add the balsamic vinegar and simmer until it has almost disappeared. Immediately add the tomatoes and toss well. Cook until the tomatoes soften slightly – just a minute or two. Toss in the basil or parsley and season to taste with salt and pepper.
  3. Pour over the chicken and serve.


Aug 052014
 

lime green microwave pressure cookerTradition and routine are strong influences in all we do, including cooking. In the kitchen, traditional techniques often prevail until we see someone doing something different, which opens our eyes.

There’s a Canadian food television show called Pitchin’ In with Toronto Chef Lynn Crawford which I particularly like. In the show, she travels around in search of the freshest ingredients in their place of origin, often relying on the locals to show her how to pick, catch or trap these ingredients. Then, she cooks a meal with the ingredients for all who helped her in the search. One episode featured lobster and Chef Lynn goes lobster fishing in the Bay of Fundy to catch some of the world’s best. Then, before she prepares it, she asks how the locals like to cook their lobsters. To her (and my!) surprise, they say their best way of preparing lobster is in the microwave! She gives it a try and actually likes it!

It’s very easy to fall into a philosophy of “the old way is the best way” when cooking. These days I try to keep my eyes and mind open to new and different cooking techniques, and never has that been more true for me than with the microwave pressure cooker. I’m very familiar with pressure cooking, having written a book full of pressure cooker recipes, but rarely used my microwave for more than popcorn or re-heating leftovers. It’s a crying shame, really, to have an appliance in the kitchen with so much to offer and do so little with it. Very few people use their microwave to its fullest capacity because they’ve never been able to get great results out of it. Foods tend to cook unevenly in the microwave and come out either dry or rubbery. Now, those who know me know that I approach new kitchen gadgets with a little skepticism. I really need to be convinced that they deserve a spot in my kitchen. When the microwave pressure cooker came into my life, I remembered Chef Lynn Crawford and the lobster and decided I needed to be open minded. What I discovered is that this cooking tool manages to use the speed of microwave cooking but gives you the results of pressure cooking - tender, juice, moist and delicious meals. It’s a win-win!

So, when it came to cooking mussels, naturally my first thought was to cook them on the stovetop in a lidded pot. But then… if lobster in the microwave can be delicious, why not try the microwave pressure cooker to cook mussels? It was quick and easy, but the best part was that they came out tasting delicious. Here’s the recipe:

Mussels with Beer, Leeks and Cream
white bowl full of mussels with bits of leek scattered. Cream sauce in bottom of bowl.
Serves 1 or 2

Ingredients:

  • 4 stalks celery, diced
  • 2 tablespoons butter
  • 1 pound (450 g) fresh mussels, scrubbed and beard removed
  • 1 leek, washed, trimmed, and thinly sliced
  • 1 12-ounce (350 mL) bottle of Belgian-style or Trappist-style beer
  • ½ cup (120 mL) heavy cream
  • salt and pepper, to taste
  • 1 tablespoon chopped fresh parsley
  • 1 lemon wedge

Directions:

  1. Place the celery and butter in the Microwave Pressure Cooker and cook, uncovered, for 3 minutes on HIGH power.
  2. Add the mussels, leek and beer to the Microwave Pressure Cooker.
  3. Place the lid on the Microwave Pressure Cooker and lock into place.
  4. Cook the mussels on HIGH for 10 minutes.
  5. When the time is up, let the pressure come down naturally by leaving the lid on the cooker until the white pressure indicator has dropped.
  6. Stir in the heavy cream. Season to taste with salt and pepper. Garnish with parsley and some squeezed lemon and serve with warm, crusty bread for dipping.

Interested in learning more about the Microwave Pressure Cooker? Tune in to QVC on Wednesday, August 6th. I’ll be there!


ML


Jul 122014
 

When I saw the sale price of cherries last week, I jumped on it and bought a few pounds. Of course, even though cherries are quite possibly my favorite fruit, I couldn’t eat that many cherries just as is (without getting ill), so I decided to make cocktail cherries. My favorite winter cocktail is a Manhattan, but I’m really not a big fan of the traditional florescent maraschino cherry. I’m always in search of proper brandied cherries or high-end maraschino type cherries. Now, I will no longer have to search. There are several recipes for brandied cherries on the Internet and they were all pretty-much the same. It was easier than I’d imagined, especially with the help of my brand-spankin’ new cherry pitter. Here’s what I did:

IMG_4727

Cocktail Cherries

Ingredients:

  • 1.5 pounds cherries (traditionally sour cherries are used, but I used sweet cherries because they were there)
  • ¾ cup sugar
  • ¾ cup water
  • seasonings: this could include a pinch of grated nutmeg, a cinnamon stick, a vanilla bean, lemon zest, whatever you fancy
  • 1.5 cups brown booze (brandy, bourbon, dark rum, rye whiskey, or a combination - I used brandy and bourbon)

Directions:

  1. Wash the cherries and remove all stems and pits. Place in a large bowl.
  2. Place the sugar, water and seasonings in a saucepan and bring to a simmer to dissolve the sugar.
  3. Add the brown booze and stir.
  4. Pour the mixture over the cherries and stir.
  5. Transfer the cherries to clean mason jars and refrigerate.


So, once the cold weather returns in three or four months, and I’m in the mood for a Manhattan I’ll not have to run around looking for the proper cherry. I’ll have a huge mason jar full of them in my fridge.

Or will I? Winter is several months away, after all…


Jul 032014
 

Tuna Poke 1

Fish is good food! We all know that. It’s good for us, full of omega-3 fatty acids, a great source of protein and easy to digest. You can tell fish is good for you because of how you feel after eating it - fresh, clean, healthy. But more than just being good for you, fish is delicious! I love fresh fish, but I especially love fresh raw fish. Sushi has become a regular meal for me, but recently I’ve found a new love for a similar raw fish preparation - Hawaiian Ahi Poke. Poke is Hawaiian for “to slice or cut” and Poke is an appetizer prepared by cutting sashimi grade Yellowfin Tuna into small cubes or pieces and combining it with sesame oil, soy sauce, some chili spice and various other ingredients. The biggest challenge to making Ahi Poke is getting the freshest Yellowfin Tuna. Of course, you know I have the answer, because you can actually get this sashimi grade fish from my friends at Anderson Seafoods, already prepared and cut into cubes for you. While I do love Ahi Poke, these Yellowfin Tuna Cubes are actually very versatile and you can make delicious Ahi ceviche tacos, spicy tuna bites and pot stickers, a tuna putanesca sauce for spaghetti and seared sesame tuna with these cubes. The Ahi Poke dish takes about 5 minutes to prepare from start to finish, and will make a statement at any dinner party, or just makes for a delicious snack for you. Give it a try!

Want to see more of the Ahi Tuna Cubes? Check out QVC on Friday, July 4th at 6pm ET.


Hawaiian Ahi Tuna Poke

Serves 6 as a small appetizer

Ingredients:

  • 4 ounces Anderson Seafoods’ Ahi Tuna Cubes
  • 2 tablespoons chopped green onion
  • 2 teaspoons soy sauce
  • 1/8 to ¼ teaspoon sesame oil
  • ¼ teaspoon chili garlic sauce
  • ¼ teaspoon honey
  • 1 to 2 teaspoons sesame seeds

Directions:

  1. Combine all ingredients and toss gently.
  2. Serve on small appetizer spoons, or with tortilla chips to scoop, or lettuce cups to wrap around the tuna.
Jun 252014
 

Spaghetti 2

Today I have the good fortune to launch yet another delicious item on QVC from my friends at Anderson Seafoods. This time, it’s not fresh fish (although you can see their full assortment of fresh (never frozen) fish on their website at any time), but a medley of delicious seafood, including shrimp, wild caught bay scallops, squid rings and wild Alaskan cod! I’ve been busy cooking this seafood up in a number of ways and there are so many things I love about this seafood medley.

First of all is its versatility. I’ve made pastas, stews, fried appetizers, a pot pie, and even a salad with the mix, but you could also make tacos or fajitas, throw it onto a pizza, and of course grill it up in a grill basket to accompany just about anything. I love the versatility of this seafood and how quickly you can put a great meal together using it as the main ingredient.

Secondly, it’s such a quick fix! In no more than two minutes of cooking time, everything is cooked up and ready to be served. It’s great when you need to put dinner together quickly and the end result is delicious and special - not your everyday quick fix!

I also love the size of all the pieces of seafood. Squid cooks very quickly and the shrimp, bay scallops and cod pieces are the right size to accompany the squid. Together all the different seafoods are complimentary to each other and sized appropriately not only for each other, but also for eating. They are the perfect bite-size.

Last, but definitely not least, is the convenience of this medley. When making a seafood dish, you often have to go and buy all the different seafoods separately. Depending on how they are sold (shrimp in one pound bags, for instance), you may have to buy more than you need for a particular dish. Anderson, on the other hand, offers the medley in one-pound bags with the four different types of seafood making up roughly 25% of that pound. Having a pound or two of this in the freezer is a cook’s safety blanket - they defrost quickly, cook quickly and can make an impressive last minute meal!

Interested? You should be!

Quick and Easy Seafood Pasta with Black Pepper and Lemon

Serves 2 to 4

Ingredients:

  • ½ pound dried spaghetti
  • 1 pound Anderson Seafoods’ seafood medley, thawed, well drained and patted dry
  • 2 tablespoons olive oil
  • 1 lemon, zest and juice
  • ¼ cup chopped fresh parsley
  • 2 tablespoons chopped fresh chives
  • salt and freshly ground black pepper

Directions:

  1. Bring a large stockpot of salted water to the boil. Add the pasta and cook according to the package directions.
  2. While the pasta is cooking, pre-heat a large sauté pan or skillet over medium-high heat. When the pasta has only 2 minutes of cooking time left, add the olive oil to the skillet and toss in the seafood medley. Cook, tossing regularly, for 1 minute and then remove the skillet from the heat.
  3. Drain the pasta, reserving ½ cup of the pasta liquid. Transfer the drained pasta to the skillet and add the lemon zest, herbs, salt and lots of freshly ground black pepper. Toss well and add lemon juice and more olive oil to taste. Add a little pasta water if necessary to loosen the pasta and seafood.


Click for recipes for Seafood, Chorizo and Corn Salad; Salt and Pepper Fried Seafood; Seafood Potpie with Puff Pastry Top; Seafood Stew with Fennel, Tomatoes and Potatoes.

May 142014
 

I’ve been doing a lot of work with BBQ Grill Pans lately and here’s something sweet and delicious that I made on my latest Cook’s Essentials BBQ Grill Pan. I love how easy it is to make and how fun it is to serve. Just give your guests a small spoon and the banana scoops out so easily. I saw these grilled banana s’mores in various places on the Internet, so I can’t claim to have invented them (or even give credit because they were in multiple places), but I do love the addition of peanut butter chips!


Close up of the Banana s'mores with blackened peel and lightly browned marshmallows

Grilled Banana S’mores

Serves 4

Ingredients:

  • 4 bananas
  • 4 tablespoons mini semi-sweet chocolate chips
  • 4 tablespoons mini peanut butter chips
  • 4 tablespoons mini marshmallows
  • 4 tablespoons graham cracker cereal

Directions:

  1. Pre-heat the grill until hot – when you hold your hand 1 to 2 inches above the grill grates, you want to pull it away after 2 or 3 seconds. Place the Cook’s Essentials® BBQ Pan on the grill and pre-heat for 5 minutes.
  2. While the grill is pre-heating, slice into the bananas lengthwise along the inside of the curve, but do not slice through the bottom of the peel. Open the banana slightly to form a pocket.
  3. Fill each pocket with chocolate chips, peanut butter chips and marshmallows. Poke the graham cracker cereal into the filling.
  4. When the BBQ Pan is ready, place the bananas on the BBQ pan, using the ridges to hold the bananas upright and close the BBQ lid. Grill for about 5 to 8 minutes, or until the banana is soft to the touch and the chocolate and marshmallows have melted.
  5. Serve with a spoon to spoon out the filling.
May 032014
 

Despite some rainy weather, grilling season is in full swing for me here in Pennsylvania. It feels so good to be outside, enjoying the weather again, cooking meals and making great backyard aromas. I’ve been testing out all sorts of accessories for the BBQ lately, and most recently I had the good fortune to take a whole new grilling system for a test drive. Overall, the STOK grill and grill insert system is pretty darn cool! STOK is really on to something here. They create both gas and electric grills and their grills have removable circles in the grill grate that can be replaced with one of their inserts, like a griddle, a vegetable basket, a cast iron kettle, a smoker infuser, a wok, a pizza stone and even a chicken roaster! I’ve had a lot of fun playing with this grill system, and as I write this, I can’t even decide which insert is my favorite.

That said, anyone who knows me, knows how much I love pizza! So one of the first things I did with the STOK grill Pizza1 
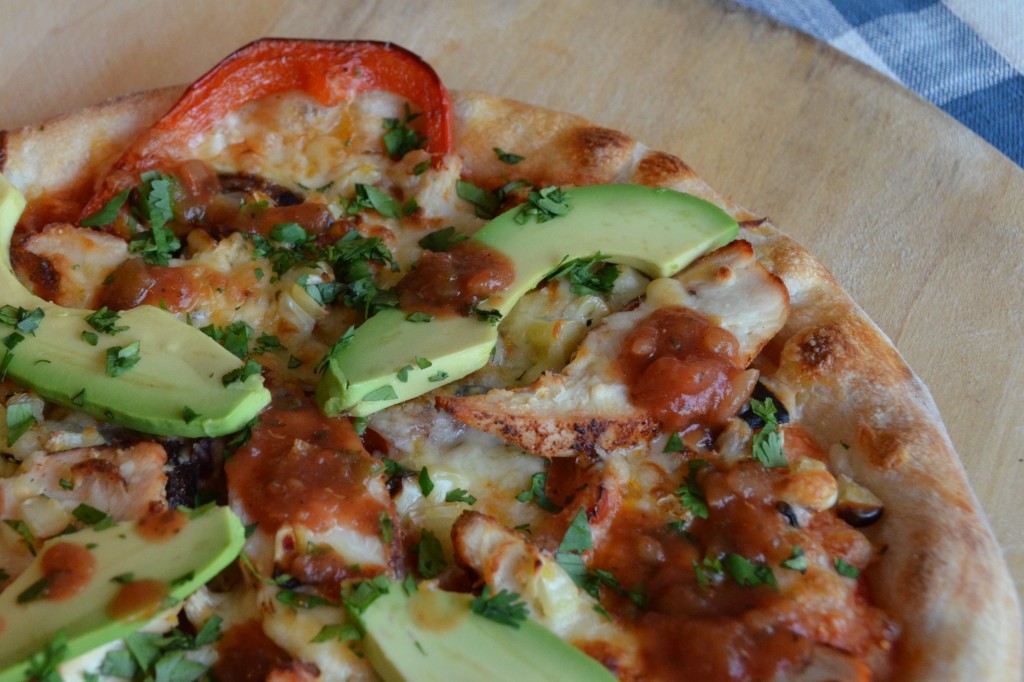
system is throw the pizza stone into place and fired up the grill. I used the pizza stone in the grill to make a Tex-Mex Pizza, which ended up being a lot like nachos on a pizza crust. The best part was being able to grill some of my pizza toppings - corn, red pepper, and chicken - for extra smokey flavor while the pizza stone was still heating up. Then cooking the pizza on the grill’s pizza stone allowed me to have one of my favorite meals without heating up the house with the oven. I’ll be showing you more recipes from my experience with STOK in the next little while, but for now, here’s the Tex Mex Pizza recipe. Yum!

Tex Mex Pizza

Makes 2 9-inch pizzas

close up shot of the pizza with avocado, chicken and red pepper visible

Ingredients:

  • 1 chicken breast
  • chili powder
  • 1 ear corn
  • olive oil
  • 1 red pepper, sliced into thin rings
  • ½ red onion, sliced into strips
  • 1 pound pizza dough, divided into two balls and at room temperature
  • ¼ cup shredded mozzarella cheese
  • ¼ cup shredded pepperjack cheese
  • salt and freshly ground black pepper
  • ¼ cup tomato salsa
  • 1 avocado, thinly sliced or diced
  • chopped fresh cilantro

Continue reading »