May 222014
 

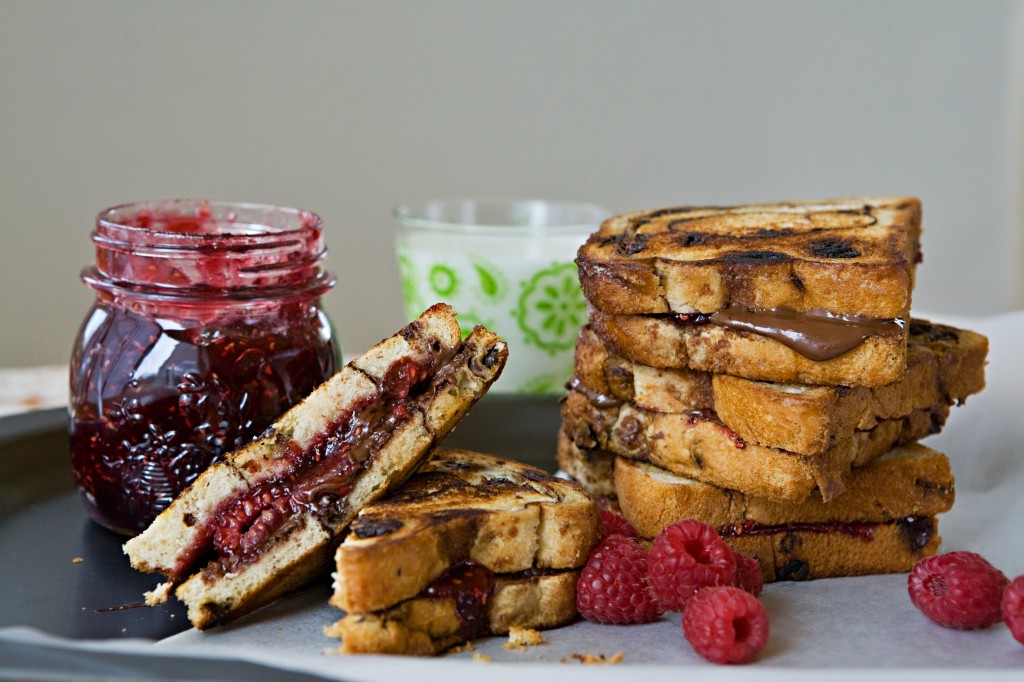
Not what you think… This is not your favorite sandwich, but a delightfully refreshing and satiating summer appetizer. I love grilling slices of cheese because it defies logic. You can’t grill just any cheese, but Halloumi, Paneer or what is sometimes called “grilling cheese” works really well and takes just a minute. Sweet grilled watermelon goes nicely with the salty cheese and olives and the mint and parsley give it a fresh finish. Here, I’ve also made griddle bread using a built-in pizza stone on a STOK grill to go with the dish.

grilled halloumi and watermelon on  a white plate with griddle bread off to the side. Blue tablecloth background

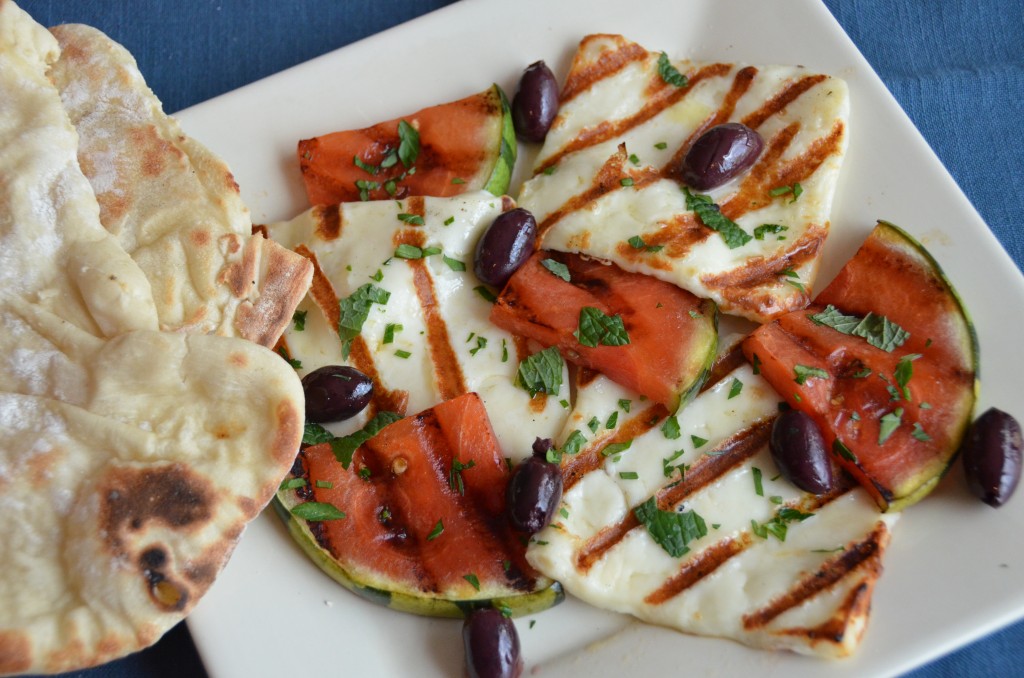
Grilled Cheese with Watermelon and Mint

Serves 4 as an appetizer

Ingredients:

  • 8 (½-inch) thick triangular slices watermelon
  • salt and freshly ground black pepper
  • extra virgin olive oil
  • 8 ounces Halloumi, Paneer or grilling cheese, sliced ¼-inch thick
  • 2 tablespoons chopped fresh mint
  • 2 tablespoons chopped fresh parsley
  • ½ lemon, zest and juice
  • 12 to 16 pitted Kalamata olives

Directions:

  1. Pre-heat your outdoor grill until hot – you can only hold your hand 1 to 2 inches above the grill for 2 to 3 seconds before pulling it away.
  2. Season the watermelon slices with salt and pepper and brush lightly with olive oil. Grill about 1 to 2 minutes per side, or until there are nice grill marks.
  3. Brush the cheese slices on both sides with olive oil. Season with salt and pepper and place on the grill until there are nice grill marks – about 1 to 2 minutes per side.
  4. Arrange the grilled cheese and grilled watermelon on a plate and sprinkle with the fresh herbs and lemon zest. Squeeze a little lemon juice and drizzle a little olive oil over the top and garnish with the Kalamata olives. Serve with fresh griddle bread.

Shot of Griddle bread on pizza stone in foreground and cheese and watermelon grilling in background

May 142014
 

I’ve been doing a lot of work with BBQ Grill Pans lately and here’s something sweet and delicious that I made on my latest Cook’s Essentials BBQ Grill Pan. I love how easy it is to make and how fun it is to serve. Just give your guests a small spoon and the banana scoops out so easily. I saw these grilled banana s’mores in various places on the Internet, so I can’t claim to have invented them (or even give credit because they were in multiple places), but I do love the addition of peanut butter chips!


Close up of the Banana s'mores with blackened peel and lightly browned marshmallows

Grilled Banana S’mores

Serves 4

Ingredients:

  • 4 bananas
  • 4 tablespoons mini semi-sweet chocolate chips
  • 4 tablespoons mini peanut butter chips
  • 4 tablespoons mini marshmallows
  • 4 tablespoons graham cracker cereal

Directions:

  1. Pre-heat the grill until hot – when you hold your hand 1 to 2 inches above the grill grates, you want to pull it away after 2 or 3 seconds. Place the Cook’s Essentials® BBQ Pan on the grill and pre-heat for 5 minutes.
  2. While the grill is pre-heating, slice into the bananas lengthwise along the inside of the curve, but do not slice through the bottom of the peel. Open the banana slightly to form a pocket.
  3. Fill each pocket with chocolate chips, peanut butter chips and marshmallows. Poke the graham cracker cereal into the filling.
  4. When the BBQ Pan is ready, place the bananas on the BBQ pan, using the ridges to hold the bananas upright and close the BBQ lid. Grill for about 5 to 8 minutes, or until the banana is soft to the touch and the chocolate and marshmallows have melted.
  5. Serve with a spoon to spoon out the filling.
May 032014
 

Despite some rainy weather, grilling season is in full swing for me here in Pennsylvania. It feels so good to be outside, enjoying the weather again, cooking meals and making great backyard aromas. I’ve been testing out all sorts of accessories for the BBQ lately, and most recently I had the good fortune to take a whole new grilling system for a test drive. Overall, the STOK grill and grill insert system is pretty darn cool! STOK is really on to something here. They create both gas and electric grills and their grills have removable circles in the grill grate that can be replaced with one of their inserts, like a griddle, a vegetable basket, a cast iron kettle, a smoker infuser, a wok, a pizza stone and even a chicken roaster! I’ve had a lot of fun playing with this grill system, and as I write this, I can’t even decide which insert is my favorite.

That said, anyone who knows me, knows how much I love pizza! So one of the first things I did with the STOK grill Pizza1 
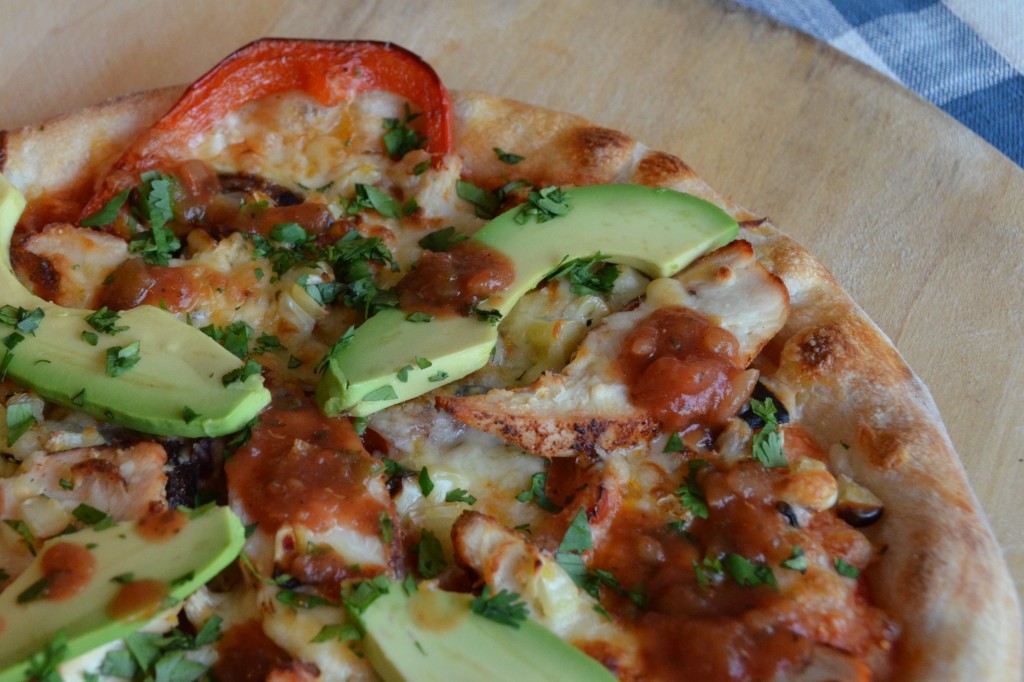
system is throw the pizza stone into place and fired up the grill. I used the pizza stone in the grill to make a Tex-Mex Pizza, which ended up being a lot like nachos on a pizza crust. The best part was being able to grill some of my pizza toppings - corn, red pepper, and chicken - for extra smokey flavor while the pizza stone was still heating up. Then cooking the pizza on the grill’s pizza stone allowed me to have one of my favorite meals without heating up the house with the oven. I’ll be showing you more recipes from my experience with STOK in the next little while, but for now, here’s the Tex Mex Pizza recipe. Yum!

Tex Mex Pizza

Makes 2 9-inch pizzas

close up shot of the pizza with avocado, chicken and red pepper visible

Ingredients:

  • 1 chicken breast
  • chili powder
  • 1 ear corn
  • olive oil
  • 1 red pepper, sliced into thin rings
  • ½ red onion, sliced into strips
  • 1 pound pizza dough, divided into two balls and at room temperature
  • ¼ cup shredded mozzarella cheese
  • ¼ cup shredded pepperjack cheese
  • salt and freshly ground black pepper
  • ¼ cup tomato salsa
  • 1 avocado, thinly sliced or diced
  • chopped fresh cilantro

Continue reading »

Mar 112014
 

What a treat!

Close up shot of salmon candy on a green plate

If you’ve never heard of salmon candy before, I’m not really surprised. It’s not something you see every day. You won’t find it in the grocery store, or even in most specialty food stores. It started out as a way for Native North Americans in the Pacific Northwest to preserve their salmon, but now it’s just a super tasty and very addictive snack! Salmon candy is made from the belly of Pacific salmon. The salmon is broken into chunks and then placed in a salt brine with sweet ingredients like honey, molasses and brown sugar for several hours. After brining, it is hot-smoked slowly until fully cooked. Salmon jerky is smoked and dried so much that it is chewy and “tuggable”, but salmon candy is soft, sweet, smoky and just plain delicious.

I had the pleasure of working with some salmon candy this week from my friends at Anderson Seafoods and found so many different ways to use it. It works in pasta, in scrambled eggs, in a green salad, as an hors d’oeuvre, with hot potato salad, with lentils and green beans… the list is endless. I loved using it in so many different ways, but I have to admit… my favorite way to eat it was just on a toothpick! Leave it out on a platter of nibbles, and I bet it’s the first to go!

Lucky for you, you’ll be able to get your hands on some of this high-end salmon delicacy through QVC on Wednesday, March 12th at 4pm ET. Don’t miss your chance!

(click on the links above for recipes!)


Feb 152014
 

Steelhead trout with melted butter, honey bell zest and parsley on top. Roasted fennel and carrots and broccoli in the background.


A fillet of Steelhead trout looks a lot like a fillet of salmon. Why is that? Well, because Steelhead is a fish that acts like salmon: it eats krill in the ocean and migrates from the ocean into freshwater to spawn. As a result, it has an appearance and flavor much like salmon. What’s the advantage of Steelhead trout? It’s a responsible choice with respect to sustainable fishing, is ranked as a “best choice” on the Monterey Bay Aquarium Seafood Watch List and is less expensive than salmon!

A Honeybell looks a lot like an orange. Why is that? Because a Honeybell is a citrus fruit hybrid cross between a Dancy tangerine and a Duncan grapefruit. It looks like a bright orange bell shaped orange. What’s the advantage of a Honeybell? It’s unbelievably sweet and is filled with juice. While it is delicious to eat, it produces so much juice and its zest is such a beautiful color, that it is a joy to cook with.

In this recipe, I put these two ingredients together and it was a lovely match. A little bright, sunshine-of-a-meal in the middle of winter.


Steelhead Trout Poached in White Wine with Honeybell Butter

Serves 2

Ingredients:

  • 2 cups white wine
  • 2 bay leaves
  • 1 tablespoon peppercorns
  • ½ small onion, sliced into thin rings
  • 4 sprigs fresh thyme
  • 1 Honeybell
  • 3 tablespoons butter, softened
  • 2 fillets Steelhead trout
  • salt and freshly ground black pepper

Directions:

  1. Combine the white wine, bay leaves, peppercorns, onion slices and fresh thyme sprigs in a sauté pan. Slice half the Honeybell into slices and add the slices to the sauté pan. Bring the liquid to a simmer and simmer very gently for 10 minutes.
  2. While the poaching liquid is simmering, season the trout with salt and set it aside.
  3. Make the Honeybell butter. Zest and juice the remaining half a Honeybell and combining the zest and juice with the softened butter in a small bowl. Beat together until well mixed and season to taste with salt and pepper. Shape the butter into two flat disks or other shape and chill in the fridge until ready to serve.
  4. Then gently place the fish into the sauté pan. Top the pan up with hot water so that the fish is covered. Poach, with the liquid simmering very gently, for 6 minutes, or until the fish is firm to the touch.
  5. Remove the fish from the pan with a spatula and plate with a piece of the Honeybell butter on top.

For more recipes using Steelhead Trout, visit my QVC recipe page here.

Jan 222014
 

A large round orange ceramic dish with Moussaka in it. A stack of plates in the background

It’s rare that I find a vegetarian version of a classic dish that I like as much as the original version, but this is one of those rare occasions! This version of the Greek classic, Moussaka uses portobello mushrooms instead of beef and it’s delicious. There’s a hint of cinnamon, but not so much to be overwhelming. It’s a not a recipe for those who don’t really like to cook, for the prep involved in putting the Moussaka together has several steps, but served with a Greek salad, it makes a perfect meal for a cold winter day.

Vegetarian Moussaka

Serve 4 to 6

Ingredients:

  • 1 large eggplant, sliced into ½-inch rounds
  • ¼ cup crumbled feta cheese
  • ¼ cup grated Parmesan cheese

Sauce:

  • 2 tablespoons olive oil
  • 1 onion, finely diced
  • 2 carrots, finely diced
  • 2 ribs celery, finely diced
  • 2 cloves garlic, minced
  • 12 ounces Crimini or Portobello mushrooms, chopped
  • 1 teaspoon dried oregano OR 3 tablespoons chopped fresh oregano leaves
  • 1 teaspoon ground cinnamon
  • 1 teaspoon salt
  • ¼ teaspoon crushed red pepper flakes
  • ¼ cup white wine (optional)
  • 1 28-ounce can crushed tomatoes

Topping:

  • 2 tablespoons butter
  • ¼ cup all-purpose flour
  • 1½ cups whole milk
  • 1 cup grated Parmesan cheese
  • ¼ teaspoon ground nutmeg
  • salt and pepper, to taste
  • 1 egg, lightly beaten

Directions:

  1. Prepare the eggplant slices by sprinkling salt on both sides, and placing the slices onto a paper towel. Cover the eggplant with another piece of paper towel and set aside for 30 minutes. (This is to help extract some of the bitter enzymes in the eggplant.) While the eggplant is soaking, pre-heat the oven to 400ºF. Brush any extra salt off the eggplant and brush both sides with olive oil. Bake on a baking sheet for 10 minutes, flip the slices over and bake for another 12 to 15 minutes or until the eggplant is tender and cooked through.
  2. Make the sauce while the eggplant is baking. Pre-heat a large sauté pan over medium-high heat. Add the olive oil and sauté the onion, carrots and celery until tender – about 10 minutes. Add the garlic, mushrooms and dried spices and cook for another 10 minutes. Add the white wine (if using) and crushed tomatoes. Cook until the sauce thickens slightly – about 15 minutes.
  3. Make the cheese sauce topping. Pre-heat a saucepan over medium heat. Melt the butter and add the flour, whisking for about 2 minutes. Whisk in the milk and bring the mixture to a boil so that it thickens. Remove the sauce from the heat and stir in the cheese and nutmeg. Season with salt and pepper and let it cool just a little, then whisk in the egg.
  4. Assemble the Moussaka. Place half of the eggplant slices in the bottom of a 2-quart ceramic baker. Pour half of the sauce on top. Sprinkle the Parmesan and feta cheeses over the casserole. Place the remaining eggplant slices on top. Pour the remaining sauce on top. Finally, pour the cheese sauce topping over everything.
  5. Transfer to the oven and bake for 40 to 50 minutes or until the top is golden brown. Let the Moussaka cool for about 10 minutes before serving.


Dec 022013
 

I made this gratin for American Thanksgiving this year and it really stood out to me as a great way to make a gratin without all the milk and cream. It was inspired by a recipe from Bon Appétit magazine and I really loved the briny caper flavor in it. It’s definitely a keeper!

Close up shot of the cross section of a potato gratin. Capers visible

Sicilian Potato Gratin

(Adapted from Bon Appétit Magazine, March 2008)

Serves 4


Ingredients:

  • 1 tablespoon olive oil, plus more for drizzling
  • 1 cup chopped onions
  • 1½ pounds Yukon Gold potatoes, scrubbed and very thinly sliced
  • ¼ cup grated Parmesan cheese (plus a little more for the top of the gratin)
  • ¼ cup finely grated Manchego cheese (or any hard Cheddar)
  • 1 clove garlic
  • 4 tablespoons capers, drained and rinsed
  • 1 cup best-quality chicken stock
  • salt and freshly ground black pepper


Directions:

  1. Pre-heat the oven to 350ºF. While the oven is pre-heating, heat a skillet over medium heat. Add the olive oil and sauté the onions until they are tender, but not browned. This will take about 10 minutes.
  2. Use a mandolin or slicer to slice the potatoes into uniformly thin slices and set aside. Combine the cheeses in a bowl and set aside.
  3. Rub the garlic clove all over the interior surface of a 9-inch square cake pan or ceramic dish.
  4. Start layering the gratin in the following order: 1/3 of the potato slices, salt and pepper, half the onions, 1 tablespoon of capers, and 1/3 of the grated cheeses. Repeat. Repeat one last time without adding the onions (they should be all used up by this point). Pour the chicken stock into the dish and push down on the potatoes firmly. Drizzle a little olive oil over the top and cover with aluminum foil.
  5. Bake for roughly 60 minutes or until the potatoes are tender when pierced with a paring knife. Uncover, sprinkle a little more grated Parmesan cheese on top, and brown the top for another 15 minutes.
  6. Remove from the oven and let it sit for a little while to set up. (You may find that there is some excess liquid in the pan. You can drain that off later.)
Oct 192013
 
shredded brussels sprouts slaw on a square platter

(missing the red onion, which I was unexpectedly out of when I made this version!)

I served this Brussels Sprouts dish at Canadian Thanksgiving this year. Celebrating Canadian Thanksgiving in October always gives me a chance to try recipes before American Thanksgiving, and this one was a winner. There are so many flavors going on in the Thanksgiving meal, that this cold crisp vegetable salad with salty Locatelli cheese was a refreshing welcome and accompaniment to the mashed potatoes, bread stuffing, cranberry sauce, turkey and gravy. Plus, it’s great in a sandwich the next day. Bonus.


Brussels Sprouts with Fennel, Radishes, Red Onion, Parsley and Locatelli Cheese

Serves 4

Ingredients:

Raw ingredients - radishes, Brussels sprouts, fennel and parsley

  • 1/2 red onion, thinly sliced, soaked in water and rinsed
  • 1 medium bulb fennel, thinly sliced
  • 1 pound Brussels Sprouts, trimmed and thinly sliced
  • 1 cup fresh parsley leaves
  • 1 bunch radishes, julienned
  • Locatelli (or Pecorino) cheese, shredded (as much or as little as you’d like)
  • 1/2 teaspoon Dijon mustard
  • salt and freshly ground black pepper
  • 1 tablespoon white wine or champagne vinegar
  • 3 tablespoons olive oil


Directions:

  1. Slice all the vegetables in very thin slices. Start with the red onion because you should soak the red onion in cold water for at least 20 minutes to take away some of the harsh flavor. You can do this while you slice the other vegetables. Mix the vegetables, the parsley leaves and the Locatelli cheese shavings together in a bowl.
  2. In a small bowl combine the mustard, salt, pepper and vinegar. Blend well to dissolve the mustard and salt. Add the olive oil and check your seasoning, seasoning again if need be. (Remember the Locatelli cheese is quite salty.)
  3. Toss the vegetables in the vinaigrette and serve. This is quite tasty the next day too.


Oct 072013
 

close up bowl of pasta with sauce mixed in

I am a sucker for pasta. Given my own way, I would have pasta at least twice a week. I love it because it’s so versatile, but I have to admit that more often than not, I turn to only a handful of recipes when I’m making a pasta. Of course I love a good marinara and a great bolognese pasta, but one of my absolute favorite pasta recipes is the one that follows. The tomato sauce is rich, the Italian sausage is spicy, the peppers are sweet and the artichokes add another dimension altogether. I think it’s just difficult for me to pass on an opportunity to enjoy this combination, so I return to it over and over again… very happily!


Rotini with Italian Sausage, Artichokes, Sun-dried Tomatoes and Peppers

Serves 4

Ingredients:

  • 4 links hot Italian sausage, casings removed and crumbled (about 2 pounds)
  • 2 red bell peppers, sliced
  • 1 yellow bell pepper, sliced
  • 2 cloves garlic, minced
  • pinch crushed red pepper flakes
  • ½ cup Cabernet Sauvignon
  • 1 28-ounce can crushed tomatoes
  • 1 8.5-ounce jar sun-dried tomatoes, drained
  • 1 zucchini, sliced into half moons
  • 1 14-ounce jar artichokes (marinated or water packed), drained
  • 2 fresh tomatoes, chopped
  • salt
  • freshly ground black pepper
  • 1 pound dried rotini or other shaped pasta
  • Parmesan cheese, grated (optional)

Directions:

  1. Heat a large sauté pan over medium-high heat. Add the crumbled sausage and cook until cooked through – about 5 minutes. Remove the sausage with a slotted spoon and set aside.
  2. Add the peppers, garlic and red pepper flakes to the sauté pan and sauté for 10 minutes or until the peppers are tender.
  3. Add the wine and bring to a simmer. Add the crushed tomatoes, return the sausage to the pan and bring to a simmer again.
  4. Add the sun-dried tomatoes, zucchini and artichokes and continue to cook for 20 minutes, or until everything has warmed through and reduced somewhat. Add the fresh tomatoes and warm through. Season to taste with salt and freshly ground black pepper.
  5. While the sauce is simmering, bring a large stockpot of salted water to a boil.
  6. Cook the pasta until it is al dente and then strain. Toss the pasta with the sauce and serve with grated Parmesan cheese at the table.


Sep 302013
 
a stack of sandwiches on a plate, one cut open in half, a pot of jam and a glass of milk

photography by Jessica Walker


This is a sandwich that I treat myself to only every now and then. The memory of it lingers and lasts for a long time. Adding the fresh raspberries really sends it over the edge. I can’t decide if this sandwich should be eaten in the morning, for lunch, or late at night. Either way, it’s sure to be a sandwich you won’t soon forget either! It’s delicious and decadent, and makes an excellent dessert, cut into quarters. Get the milk ready!


Sweet Chocolate and Berry Sandwich

Serves 4

Ingredients:

  • 8 slices cinnamon raisin bread
  • ½ cup chocolate hazelnut spread
  • ½ cup raspberry jam
  • 24 raspberries
  • Butter, softened

Directions:

  1. Spread the butter on one side of all 8 slices of bread. Assemble the sandwiches by placing the bread slices butter side down on a work surface. Divide and spread the chocolate hazelnut spread on four of the slices of bread. Divide and spread the raspberry jam on the other four slices of bread. Press the raspberries into the four slices of chocolate covered bread, and top with the jam covered slices.
  2. Pre-heat a skillet or griddle (ideally square in shape) over medium heat. Add the assembled sandwiches and fry on both sides until nicely browned – about 3 – 4 minutes. Enjoy with a tall glass of milk!