Sep 232014
 

sliced chicken breast on a white plate with greens in background and tomato balsamic sauce on top


Making a pan sauce is one of my favorite things to do when I’m cooking. It’s quick, easy, delicious and finishes off the dish nicely. Plus, it forces you to let the meat rest while you make the sauce, and letting the meat rest is so important to keep it juicy and moist. But wait… there’s more… making a pan sauce is like doing half the dishes - by deglazing, you clean off the bottom of the pan as you incorporate all those tasty brown bits into the sauce AND making the sauce doesn’t make a second pan dirty. It’s a win-win-win-win!

Need a little tutorial on making a pan sauce once you’ve finished cooking your steak, chicken, pork or fish? It’s super easy. You just need to remember three (or maybe four) things:

  • Add Flavor: You start by adding some onion, shallots, garlic, and/or herbs to give the sauce some flavor.
  • Add Liquid or something acidic: This will be the main flavor of the sauce - wine, stock, juice, tomatoes
  • Let it Reduce: The flavors need time to concentrate and blend and the sauce needs to thicken slightly, so let the mixture simmer and reduce for 2 or 3 minutes, or until you feel it looks and tastes right.
  • Finish the Seasoning: After you taste it above, you might think it’s perfect or you might think it needs something - a pinch of salt, a nub of butter to mellow it all, a squeeze of lemon to brighten it. Season it up and serve it!

Here’s a 10-minute lesson on making a pan sauce:


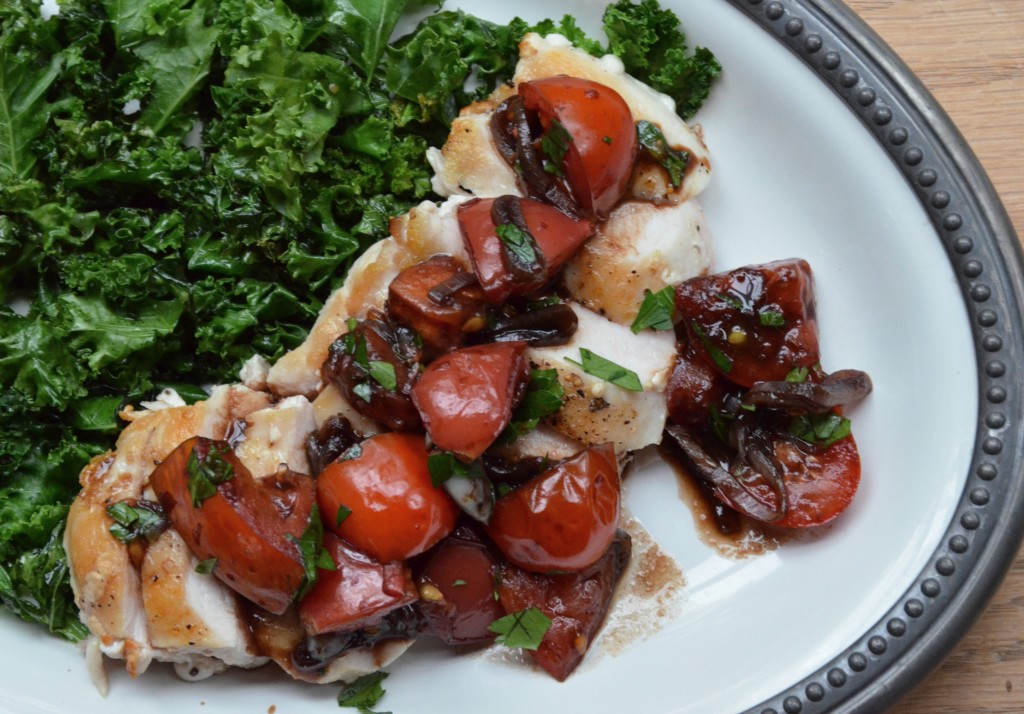
Chicken Breasts with Tomato Balsamic Sauce

Serves 4

Ingredients:

  • 4 (6-ounce) chicken breasts
  • salt and freshly ground black pepper
  • olive oil
  • 2 shallots, thinly sliced
  • 1 clove garlic, smashed
  • ¼ cup balsamic vinegar
  • 2 cups cherry tomatoes, quartered (or chopped fresh tomatoes)
  • ¼ cup chopped fresh parsley or basil leaves

Directions:

  1. Pre-heat a large non-stick skillet over medium-high heat and season the chicken with salt and pepper. Add olive oil to the skillet and sear the chicken breasts, cooking for about 3 to 5 minutes on each side (depending on thickness), or until firm to the touch. Remove from the skillet and set aside.
  2. Add the shallot and garlic to the skillet and cook for two minutes. Add the balsamic vinegar and simmer until it has almost disappeared. Immediately add the tomatoes and toss well. Cook until the tomatoes soften slightly – just a minute or two. Toss in the basil or parsley and season to taste with salt and pepper.
  3. Pour over the chicken and serve.


Jul 122014
 

When I saw the sale price of cherries last week, I jumped on it and bought a few pounds. Of course, even though cherries are quite possibly my favorite fruit, I couldn’t eat that many cherries just as is (without getting ill), so I decided to make cocktail cherries. My favorite winter cocktail is a Manhattan, but I’m really not a big fan of the traditional florescent maraschino cherry. I’m always in search of proper brandied cherries or high-end maraschino type cherries. Now, I will no longer have to search. There are several recipes for brandied cherries on the Internet and they were all pretty-much the same. It was easier than I’d imagined, especially with the help of my brand-spankin’ new cherry pitter. Here’s what I did:

IMG_4727

Cocktail Cherries

Ingredients:

  • 1.5 pounds cherries (traditionally sour cherries are used, but I used sweet cherries because they were there)
  • ¾ cup sugar
  • ¾ cup water
  • seasonings: this could include a pinch of grated nutmeg, a cinnamon stick, a vanilla bean, lemon zest, whatever you fancy
  • 1.5 cups brown booze (brandy, bourbon, dark rum, rye whiskey, or a combination - I used brandy and bourbon)

Directions:

  1. Wash the cherries and remove all stems and pits. Place in a large bowl.
  2. Place the sugar, water and seasonings in a saucepan and bring to a simmer to dissolve the sugar.
  3. Add the brown booze and stir.
  4. Pour the mixture over the cherries and stir.
  5. Transfer the cherries to clean mason jars and refrigerate.


So, once the cold weather returns in three or four months, and I’m in the mood for a Manhattan I’ll not have to run around looking for the proper cherry. I’ll have a huge mason jar full of them in my fridge.

Or will I? Winter is several months away, after all…


Jul 032014
 

Tuna Poke 1

Fish is good food! We all know that. It’s good for us, full of omega-3 fatty acids, a great source of protein and easy to digest. You can tell fish is good for you because of how you feel after eating it - fresh, clean, healthy. But more than just being good for you, fish is delicious! I love fresh fish, but I especially love fresh raw fish. Sushi has become a regular meal for me, but recently I’ve found a new love for a similar raw fish preparation - Hawaiian Ahi Poke. Poke is Hawaiian for “to slice or cut” and Poke is an appetizer prepared by cutting sashimi grade Yellowfin Tuna into small cubes or pieces and combining it with sesame oil, soy sauce, some chili spice and various other ingredients. The biggest challenge to making Ahi Poke is getting the freshest Yellowfin Tuna. Of course, you know I have the answer, because you can actually get this sashimi grade fish from my friends at Anderson Seafoods, already prepared and cut into cubes for you. While I do love Ahi Poke, these Yellowfin Tuna Cubes are actually very versatile and you can make delicious Ahi ceviche tacos, spicy tuna bites and pot stickers, a tuna putanesca sauce for spaghetti and seared sesame tuna with these cubes. The Ahi Poke dish takes about 5 minutes to prepare from start to finish, and will make a statement at any dinner party, or just makes for a delicious snack for you. Give it a try!

Want to see more of the Ahi Tuna Cubes? Check out QVC on Friday, July 4th at 6pm ET.


Hawaiian Ahi Tuna Poke

Serves 6 as a small appetizer

Ingredients:

  • 4 ounces Anderson Seafoods’ Ahi Tuna Cubes
  • 2 tablespoons chopped green onion
  • 2 teaspoons soy sauce
  • 1/8 to ¼ teaspoon sesame oil
  • ¼ teaspoon chili garlic sauce
  • ¼ teaspoon honey
  • 1 to 2 teaspoons sesame seeds

Directions:

  1. Combine all ingredients and toss gently.
  2. Serve on small appetizer spoons, or with tortilla chips to scoop, or lettuce cups to wrap around the tuna.
Jun 252014
 

Spaghetti 2

Today I have the good fortune to launch yet another delicious item on QVC from my friends at Anderson Seafoods. This time, it’s not fresh fish (although you can see their full assortment of fresh (never frozen) fish on their website at any time), but a medley of delicious seafood, including shrimp, wild caught bay scallops, squid rings and wild Alaskan cod! I’ve been busy cooking this seafood up in a number of ways and there are so many things I love about this seafood medley.

First of all is its versatility. I’ve made pastas, stews, fried appetizers, a pot pie, and even a salad with the mix, but you could also make tacos or fajitas, throw it onto a pizza, and of course grill it up in a grill basket to accompany just about anything. I love the versatility of this seafood and how quickly you can put a great meal together using it as the main ingredient.

Secondly, it’s such a quick fix! In no more than two minutes of cooking time, everything is cooked up and ready to be served. It’s great when you need to put dinner together quickly and the end result is delicious and special - not your everyday quick fix!

I also love the size of all the pieces of seafood. Squid cooks very quickly and the shrimp, bay scallops and cod pieces are the right size to accompany the squid. Together all the different seafoods are complimentary to each other and sized appropriately not only for each other, but also for eating. They are the perfect bite-size.

Last, but definitely not least, is the convenience of this medley. When making a seafood dish, you often have to go and buy all the different seafoods separately. Depending on how they are sold (shrimp in one pound bags, for instance), you may have to buy more than you need for a particular dish. Anderson, on the other hand, offers the medley in one-pound bags with the four different types of seafood making up roughly 25% of that pound. Having a pound or two of this in the freezer is a cook’s safety blanket - they defrost quickly, cook quickly and can make an impressive last minute meal!

Interested? You should be!

Quick and Easy Seafood Pasta with Black Pepper and Lemon

Serves 2 to 4

Ingredients:

  • ½ pound dried spaghetti
  • 1 pound Anderson Seafoods’ seafood medley, thawed, well drained and patted dry
  • 2 tablespoons olive oil
  • 1 lemon, zest and juice
  • ¼ cup chopped fresh parsley
  • 2 tablespoons chopped fresh chives
  • salt and freshly ground black pepper

Directions:

  1. Bring a large stockpot of salted water to the boil. Add the pasta and cook according to the package directions.
  2. While the pasta is cooking, pre-heat a large sauté pan or skillet over medium-high heat. When the pasta has only 2 minutes of cooking time left, add the olive oil to the skillet and toss in the seafood medley. Cook, tossing regularly, for 1 minute and then remove the skillet from the heat.
  3. Drain the pasta, reserving ½ cup of the pasta liquid. Transfer the drained pasta to the skillet and add the lemon zest, herbs, salt and lots of freshly ground black pepper. Toss well and add lemon juice and more olive oil to taste. Add a little pasta water if necessary to loosen the pasta and seafood.


Click for recipes for Seafood, Chorizo and Corn Salad; Salt and Pepper Fried Seafood; Seafood Potpie with Puff Pastry Top; Seafood Stew with Fennel, Tomatoes and Potatoes.

May 222014
 

Not what you think… This is not your favorite sandwich, but a delightfully refreshing and satiating summer appetizer. I love grilling slices of cheese because it defies logic. You can’t grill just any cheese, but Halloumi, Paneer or what is sometimes called “grilling cheese” works really well and takes just a minute. Sweet grilled watermelon goes nicely with the salty cheese and olives and the mint and parsley give it a fresh finish. Here, I’ve also made griddle bread using a built-in pizza stone on a STOK grill to go with the dish.

grilled halloumi and watermelon on  a white plate with griddle bread off to the side. Blue tablecloth background

Grilled Cheese with Watermelon and Mint

Serves 4 as an appetizer

Ingredients:

  • 8 (½-inch) thick triangular slices watermelon
  • salt and freshly ground black pepper
  • extra virgin olive oil
  • 8 ounces Halloumi, Paneer or grilling cheese, sliced ¼-inch thick
  • 2 tablespoons chopped fresh mint
  • 2 tablespoons chopped fresh parsley
  • ½ lemon, zest and juice
  • 12 to 16 pitted Kalamata olives

Directions:

  1. Pre-heat your outdoor grill until hot – you can only hold your hand 1 to 2 inches above the grill for 2 to 3 seconds before pulling it away.
  2. Season the watermelon slices with salt and pepper and brush lightly with olive oil. Grill about 1 to 2 minutes per side, or until there are nice grill marks.
  3. Brush the cheese slices on both sides with olive oil. Season with salt and pepper and place on the grill until there are nice grill marks – about 1 to 2 minutes per side.
  4. Arrange the grilled cheese and grilled watermelon on a plate and sprinkle with the fresh herbs and lemon zest. Squeeze a little lemon juice and drizzle a little olive oil over the top and garnish with the Kalamata olives. Serve with fresh griddle bread.

Shot of Griddle bread on pizza stone in foreground and cheese and watermelon grilling in background

Feb 152014
 

Steelhead trout with melted butter, honey bell zest and parsley on top. Roasted fennel and carrots and broccoli in the background.


A fillet of Steelhead trout looks a lot like a fillet of salmon. Why is that? Well, because Steelhead is a fish that acts like salmon: it eats krill in the ocean and migrates from the ocean into freshwater to spawn. As a result, it has an appearance and flavor much like salmon. What’s the advantage of Steelhead trout? It’s a responsible choice with respect to sustainable fishing, is ranked as a “best choice” on the Monterey Bay Aquarium Seafood Watch List and is less expensive than salmon!

A Honeybell looks a lot like an orange. Why is that? Because a Honeybell is a citrus fruit hybrid cross between a Dancy tangerine and a Duncan grapefruit. It looks like a bright orange bell shaped orange. What’s the advantage of a Honeybell? It’s unbelievably sweet and is filled with juice. While it is delicious to eat, it produces so much juice and its zest is such a beautiful color, that it is a joy to cook with.

In this recipe, I put these two ingredients together and it was a lovely match. A little bright, sunshine-of-a-meal in the middle of winter.


Steelhead Trout Poached in White Wine with Honeybell Butter

Serves 2

Ingredients:

  • 2 cups white wine
  • 2 bay leaves
  • 1 tablespoon peppercorns
  • ½ small onion, sliced into thin rings
  • 4 sprigs fresh thyme
  • 1 Honeybell
  • 3 tablespoons butter, softened
  • 2 fillets Steelhead trout
  • salt and freshly ground black pepper

Directions:

  1. Combine the white wine, bay leaves, peppercorns, onion slices and fresh thyme sprigs in a sauté pan. Slice half the Honeybell into slices and add the slices to the sauté pan. Bring the liquid to a simmer and simmer very gently for 10 minutes.
  2. While the poaching liquid is simmering, season the trout with salt and set it aside.
  3. Make the Honeybell butter. Zest and juice the remaining half a Honeybell and combining the zest and juice with the softened butter in a small bowl. Beat together until well mixed and season to taste with salt and pepper. Shape the butter into two flat disks or other shape and chill in the fridge until ready to serve.
  4. Then gently place the fish into the sauté pan. Top the pan up with hot water so that the fish is covered. Poach, with the liquid simmering very gently, for 6 minutes, or until the fish is firm to the touch.
  5. Remove the fish from the pan with a spatula and plate with a piece of the Honeybell butter on top.

For more recipes using Steelhead Trout, visit my QVC recipe page here.

May 182013
 
Spaghetti with tuna, tomatoes, capers, basil, olives in a white bowl

Spaghetti with Tuna Putanesca Sauce

As I often have the pleasure to do, I’ve been eating a lot of fresh fish from Anderson Seafoods lately. The fish from Anderson Seafoods is one of my favorite food items to present on QVC. The fact that it arrives at my door fresh (never been frozen) always astonishes me, and that freshness comes through when you cook and eat it. Absolutely delicious!

Then there’s the health aspect. No other part of my work life leaves me feeling as healthy as working with Anderson Seafoods! Continue reading »

Apr 292013
 

Just typing the words “grilling Rockfish” makes it feel like summer. For instance,

“What are you doing for dinner?”

“Me? Oh, I’m grilling Rockfish.”

The words immediately conjure up images of backyards, hot grills, fresh fish and delicious meals. It’s not just the words, however, that make you want to put on a pair of shorts, lie back in a lounge chair and grab a glass of white wine. If you actually get out there and grill some Rockfish you’ll see that the feeling of summer will be upon you in no time. I experienced this over the weekend and can testify to its truth.

a piece of grilled Pacific Rockfish with colorful salsa - orange segments, red pepper, herbs - on top

Grilled Pacific Rockfish with a Citrus-Herb Salsa

For those of you unfamiliar with Rockfish, there are more than 70 species of Rockfish living off the West Coast of North America. Pacific Rockfish is a firm, lean, mildly-flavored, pink-fleshed fish. It is sometimes marketed as Snapper, Red Snapper, or Pacific Snapper on the west coast. (True Red Snapper, however, is an Atlantic fish.) Pacific Rockfish is a very approachable fish. It’s delicious with an almost sweet flavor, tender and flakey, and appeals to both the fish-lover and those who have just started to incorporate fish into their weekly diet (which we should all be trying to do!).

There are so many ways to prepare Pacific Rockfish. It’s easy and versatile. Continue reading »

Nov 192012
 
a whole roast turkey on a white platter with oranges and herbs around it.

@ Bochkarev Photography

It’s the monday before American Thanksgiving and the plans for this thursday’s meal are under way. As I write this, the turkey stock is simmering on the stovetop and the turkey brine is cooling on the counter. I’ve been brining my Thanksgiving turkeys for several years now. It’s easy to do and really does result in a deliciously moist turkey. All you need is a little forethought and some room in your refrigerator.

To brine your turkey just means to submerge it in a salty solution over a period of time. What happens when you brine is all science. The brine works to flavor the turkey through the process of osmosis. The salty solution initially draws moisture out of the turkey, but then, the salty solution gets drawn back into the turkey, taking along with it all the great flavors of whatever you’ve put into the brine. The salt denatures the cells of the turkey meat, making them better able to hold moisture. And so, after some time in the brine, those cells can actually hold 10 - 15% more water than they did before brining.

There are a couple of simple ratios to remember when you’re brining.

  • Use 1 cup of table salt (or 1.5 cups kosher salt because kosher salt has a higher volume by weight) for ever 1 gallon of water you need to cover the turkey.
  • Brine the turkey 1 hour for every pound of turkey.

At it’s most basic level, a brine could consist of just water and salt, but since you’re going to the effort of brining, why not put some other flavors in there that will help season the center of your Thanksgiving plate? Here’s what I use in a brine: Continue reading »

Nov 102012
 

Last week, I found myself inundated with salad greens. Superstorm Sandy left my friends without power, and I inherited all their perishable food so that it wouldn’t go to waste. For someone who cooks for only one or two most of the time and shops every day for whatever it is I want that night, inheriting the weekly produce for a family of three was a little overwhelming. I had a large tub of mixed greens (you know - the size that you can wash a baby or small dog in!), a huge bag of spinach, and a couple of heads of radicchio, all on top of the usual box of greens and other salad ingredients that I had on hand for myself. It looked like salad was going to be an “every meal accompaniment” - with eggs for breakfast, as an entrée for lunch and along side every dinner - for as long as they would last.

The good news was… I love salad. I truly do. I have a fondness for foods that are so variable (like omelets, pizza, pastas). You can add any mixture of ingredients and dressings to a bowl of greens and change the salad completely from what it was the last time you had it. All this salad got me thinking about vinaigrettes and in talking with my friends about my overabundance of salad greens, I realized that the simplicity of a vinaigrette often eludes the home cook. So, I thought I’d put together some tips for making a perfect vinaigrette. Continue reading »