May 142014
 

I’ve been doing a lot of work with BBQ Grill Pans lately and here’s something sweet and delicious that I made on my latest Cook’s Essentials BBQ Grill Pan. I love how easy it is to make and how fun it is to serve. Just give your guests a small spoon and the banana scoops out so easily. I saw these grilled banana s’mores in various places on the Internet, so I can’t claim to have invented them (or even give credit because they were in multiple places), but I do love the addition of peanut butter chips!


Close up of the Banana s'mores with blackened peel and lightly browned marshmallows

Grilled Banana S’mores

Serves 4

Ingredients:

  • 4 bananas
  • 4 tablespoons mini semi-sweet chocolate chips
  • 4 tablespoons mini peanut butter chips
  • 4 tablespoons mini marshmallows
  • 4 tablespoons graham cracker cereal

Directions:

  1. Pre-heat the grill until hot – when you hold your hand 1 to 2 inches above the grill grates, you want to pull it away after 2 or 3 seconds. Place the Cook’s Essentials® BBQ Pan on the grill and pre-heat for 5 minutes.
  2. While the grill is pre-heating, slice into the bananas lengthwise along the inside of the curve, but do not slice through the bottom of the peel. Open the banana slightly to form a pocket.
  3. Fill each pocket with chocolate chips, peanut butter chips and marshmallows. Poke the graham cracker cereal into the filling.
  4. When the BBQ Pan is ready, place the bananas on the BBQ pan, using the ridges to hold the bananas upright and close the BBQ lid. Grill for about 5 to 8 minutes, or until the banana is soft to the touch and the chocolate and marshmallows have melted.
  5. Serve with a spoon to spoon out the filling.
Sep 302013
 
a stack of sandwiches on a plate, one cut open in half, a pot of jam and a glass of milk

photography by Jessica Walker


This is a sandwich that I treat myself to only every now and then. The memory of it lingers and lasts for a long time. Adding the fresh raspberries really sends it over the edge. I can’t decide if this sandwich should be eaten in the morning, for lunch, or late at night. Either way, it’s sure to be a sandwich you won’t soon forget either! It’s delicious and decadent, and makes an excellent dessert, cut into quarters. Get the milk ready!


Sweet Chocolate and Berry Sandwich

Serves 4

Ingredients:

  • 8 slices cinnamon raisin bread
  • ½ cup chocolate hazelnut spread
  • ½ cup raspberry jam
  • 24 raspberries
  • Butter, softened

Directions:

  1. Spread the butter on one side of all 8 slices of bread. Assemble the sandwiches by placing the bread slices butter side down on a work surface. Divide and spread the chocolate hazelnut spread on four of the slices of bread. Divide and spread the raspberry jam on the other four slices of bread. Press the raspberries into the four slices of chocolate covered bread, and top with the jam covered slices.
  2. Pre-heat a skillet or griddle (ideally square in shape) over medium heat. Add the assembled sandwiches and fry on both sides until nicely browned – about 3 – 4 minutes. Enjoy with a tall glass of milk!


Sep 242013
 

a wedge of sticky toffee pudding on a china plate with sauce dripping down the sides

Oh, Sticky Toffee Pudding… why are you so good?

Sticky Toffee Pudding

Serves 10 to 12

Ingredients:

  • 1 cup pitted dates, chopped
  • 1 teaspoon baking soda
  • ¼ cup butter, softened
  • 1 cup turbinado sugar (or light brown sugar)
  • 2 eggs
  • ½ teaspoon pure vanilla extract
  • 1½ cups all-purpose flour
  • 2 teaspoons baking powder
  • ¼ teaspoon salt
    For the Sauce:
  • ½ cup turbinado sugar (or light brown sugar)
  • ½ cup butter
  • ½ cup heavy cream

Directions:

  1. Pre-heat the oven to 350ºF.
  2. Place the dates into a small saucepan with 1 cup of water and bring to a boil. Simmer for 4 to 5 minutes or until soft. Then, remove the pan from the heat and add the baking soda. (The mixture will foam and then settle down again. The baking soda will help break down the skins of the dates so they more easily become a uniform part of the pudding later on.) Remove from the heat and let the dates cool.
  3. Using an electric hand mixer or stand mixer, cream the butter and sugar until light and fluffy. Add the eggs one at a time and mix in the vanilla extract.
  4. In a separate bowl, combine the flour, baking powder and salt. Add this mixture to the creamed butter mixture and stir in the cooled dates. Transfer the pudding mixture to the 10-inch sauté pan and send it to the oven to bake for 30 minutes or until golden brown. It should feel firm in the center but give a little.
  5. While the pudding is in the oven, make the sauce by combining the sugar, butter and heavy cream and simmering until it is a golden caramel color and slightly thickened.
  6. Turn out the sticky toffee pudding while it is still warm and pour the sauce over the top to drench it!


Nov 282012
 

An apple pie on a cooling rack with two red apples in the background


There are two things I love about pie - the pastry and the filling.

Ok, so I love everything about pies! After all, what’s not to love? What could be better than a warm, flakey crust that breaks gently under your fork paired with a warm sweet fruit filling? It’s a dessert that pleases your heart as much as your taste buds. It’s sort of the chicken noodle soup of the dessert world.

If I had to choose which is more important to me in a pie, the pastry or the filling, I’d probably be forced to go with the pastry (although the two components truly are inseparable). I like a pastry made of butter, rather than shortening. The butter gives the pastry great flavor and a crisp texture. Shortening does make a flakey crust, but I can’t go without the flavor of butter. Sometimes I do compromise, however, and accept a pastry made of both.

The rule to making pastry is simple – keep everything cold. The goal is to work butter into the dough without completely blending it into the flour. In a finished pastry, you should still be able to see chunks of butter. Those patches of butter will separate the proteins in the flour when baked, making it more like flaky pastry than chewy bread. By keeping the butter cold, you run less risk of blending it into the flour. By using ice-cold water, you also increase your chances of keeping the butter in small chunks.

How the pastry is baked is critical. It’s easy to get the top crust to look perfectly golden brown, but it’s the bottom crust that needs help cooking through and crisping up. It is the bottom crust after all that is sitting at the bottom of a pie pan with moist fruit filling piled on top. You can see how it would be a challenge to ensure the bottom crust is cooked through and has that prized pie texture. There are a few things a home baker can do to get the pastry cooked properly on the bottom of a pie. Continue reading »

Jun 092012
 

A piece of olive oil cake with berries in the foreground and a dollop of Greek yogurt on top

In almost every circumstance, when it comes to dessert, I want chocolate. Chocolate something. Chocolate anything. So, when I come across a dessert I really enjoy that does not have anything to do with chocolate, I pay attention. Yesterday, I made one such dessert. It was so summer and I loved it - delicately sweet, moist and with whispers of orange and almond flavors. Served with some strawberries and Greek yogurt for a tart contrast, it was the most refreshing dessert I’ve had in some time (and there are not too many desserts that are refreshing!). Continue reading »

Apr 152012
 

a yellow ceramic dish with a sunflower on it, filled with marmalade bread puddingI’ve always been a morning person. It’s not like I don’t love sleeping in or waking up slowly in my wonderful bed, but there’s something about getting up early, before everyone else, and having a head start on the day. It’s nice to start the day feeling like you have the advantage. I guess that’s what helped me enjoy my job as a baker years ago, when my shift allowed me to actually watch the sun come up a few hours after I started work. That, however, is taking “morning person” to an extreme.

These days, I get up early, have some coffee and check out what’s new in my garden before I start work. Spring is my favorite time of year, and spring mornings are very special indeed.

If you’re a morning person, here’s a great way to start a weekend day - Marmalade Bread and Butter Pudding. Continue reading »

Feb 122012
 
chunks of dark chocolate on a wooden board

photography by Janine Lamontagne

This coming Tuesday, February 14th, is the day we celebrate… chocolate! Well, I suppose Valentine’s Day is supposed to be a celebration of Love, but so many of us seem to celebrate love with chocolate, so I prefer to think of it as a celebration of the love of chocolate. With that said, Tuesday is no different for me than any other day of the year!

I’ve loved chocolate ever since I can remember eating. I remember all the Easter chocolate eggs I received as a kid. I remember the chocolate letter “M” I was always given at Christmastime. I remember sneaking chocolate chips out of the old coffee tin where they were stored whenever I could get away with it (read here). I remember my Great Auntie Nelly giving me a super large Toblerone bar when I was four and my mother finding me sick in the bathroom an hour later after I’d finished the whole thing in one sitting. I still love Toblerone bars. I love chocolate. Always have. Always will.

These days, I always have a stockpile of chocolate in my house. Some of it I keep in the basement, hoping that I’ll forget that it’s there most of the time, but remember that I have it in times of emergency (which would be any time that I can’t find chocolate in my house). The chocolate that I keep in my kitchen is high end dark chocolate for the most part. Why dark chocolate? Well, because I love chocolate more than I love sugar. Dark chocolate has less sugar and more actual cocoa than milk chocolate. In fact, by FDA regulation, dark chocolate must have at least 35% chocolate liquor (the ground or melted nib of the cocoa bean) whereas milk chocolate only needs to have 10%. The rest of the chocolate is made up of sugar, cocoa butter and sometimes milk. The dark chocolate that I prefer usually has at least 75% chocolate liquor. I’m serious about my cocoa solids! I like a little bitterness in chocolate, more than a milky creamy chocolate flavor. To each his or her own (but don’t think I ever turn down good quality milk chocolate!).

My love of chocolate has made choosing a dessert off a menu very easy. The first glance at the menu simply zooms in on what chocolate options are present. There is always one and usually no more than two. That makes decision-making super easy. Here’s a recipe for one of the most classic chocolate desserts that happens to be a favorite of mine. Great for Valentine’s Day or, if you’re like me, any day of the year.

Chocolate Espresso Mousse

(from Blue Jean Chef: Comfortable in the Kitchen)

a martini glass with chocolate mousse, whipped cream and espresso bean on a metal tray with a red and white napkin

photography by Jessica Walker

Serves 4

Ingredients:

  • 4 ounces bittersweet chocolate, chopped
  • 2 tablespoons butter
  • 2 egg yolks
  • ½ teaspoon pure vanilla extract
  • 1 teaspoon instant espresso powder
  • 2 egg whites
  • 4 teaspoons sugar
  • ½ cup heavy cream, plus more for garnish
  • 2 tablespoons sugar
  • espresso beans, for garnish

Directions:

  1. Melt the chocolate and butter together in a double boiler or in a bowl in the microwave. Let the chocolate cool slightly. Add the egg yolks to the chocolate one at a time, beating well between each addition. Add the vanilla extract and the instant espresso powder and mix well.
  2. Whip the egg whites to soft peak stage (when the egg whites will almost stand up on their own at the end of the whisk – looking like a chocolate kiss). Add the sugar and beat again until glossy.
  3. In a separate bowl, whip the heavy cream until it reaches soft peaks.
  4. Fold the egg whites into the chocolate mixture carefully, trying not to deflate the egg whites too much. Then, fold in the whipped cream and combine gently until no more streaks of white appear.
  5. Transfer to individual serving bowls or glasses. Refrigerate for 30 minutes, and then serve garnished with a dollop of whipped cream and an espresso bean or two. If you make the mousse ahead of time and store it in the refrigerator, let it sit on the kitchen counter for 20 to 30 minutes before serving.


Feb 052012
 

a row of Honeybells in an oval wooden bowl on a blue and cream checked cloth

If I ever get the winter blues, it happens in February. February can be cold. February can be gray and dirty from salt and sand on the roads. February is after all the fun of the holidays. In February the novelty of winter has worn off. February is a long way from April and May. Now, I know it’s only just the beginning of February, but I’m already on alert for the blues. Truth be told, we’ve had a pretty mild winter so far in the East. There have been a few cold days, but many mild days mixed in there. Even up in Ontario, Canada where I spend some of my time, the temperatures are cooler, but there’s hardly any snow on the ground. Trouble is, it’s not the cold or the snow that gets me down in the winter. It’s the lack of sunshine. If several gray days are strung together, I find my mood gets lower and lower and I long for spring and sunshine.

Last week, however, a little sunshine arrived in the mail. A case of Cushman’s Honeybells was left on my doorstep! The timing of these delicious fruit - a cross between a Dancy Tangerine and a Duncan Grapefruit - is perfect. In January and February, right when I need a little sunshine, is exactly when the Honeybell is in season. Of course, some of my Honeybells went straight into a glass as some of the most delicious citrus juice I have all year. Others I quartered and ate over the sink as the juice spilled out everywhere. The joy of getting a case of Honeybells is that you can enjoy some as is and still have more left over to make something interesting. In years past, I’ve made marmalade with my Honeybells (click here for a recipe, or here to read more about Honeybells), but this year I decided to do something a little different and less time consuming.

This year’s Honeybell recipe is for a granita - a dessert fruit ice. I made Honeybell Mint Granita for dessert for some friends. We had it after some spicy Indian food, and it was so refreshing and delicious - a perfect end to a great evening. A little sunny end to a gray day in February. The only thing missing from the evening - the blues.

Honeybell Mint Granita

honeybell granita in a hollowed out honeybell peel on a white plate with two cookies on the side

Serves 4 to 6

Ingredients:

  • 6 Honeybells (about 3½ cups juice)
  • sugar (if needed to taste)
  • 2 tablespoons orange liqueur (Grand Marnier)
  • 2 tablespoons mint (or basil), thinly sliced (chiffonade)

Directions:

  1. If you want to serve the granita in the orange skins, slice the tops off the Honeybells and hollow out the inside with a grapefruit knive or spoon. Do this over a strainer over a bowl so that you can catch all the insides of the Honeybell, along with the juice. Press the Honeybell pulp in the strainer to extract as much of the juice as possible. Chill the hollowed out orange peels in the freezer.
  2. If you are just making the granita to serve in martini glasses or small bowls, slice the Honeybells in half and juice them. You should end up with about 3½ cups of juice.
  3. Add sugar only if needed to sweeten the juice. Stir in the orange liqueur and the mint and pour the mixture into a shallow baking pan. The liquid should be no more than 1 inch deep. Place the pan in the freezer and let it solidify for one hour.
  4. Remove the pan from the freezer and scrape it with a fork or spoon to break up what has frozen. Return it to the freezer for another hour. Repeat the scraping and return it to the freezer for another hour. Do this until the granita is the desired consistency - flakes or granules of ice.
  5. Serve in the hollowed out orange peels or in martini glasses with a sprig of mint on top.
Nov 142011
 

photography by Daniel Loiselle

A dear friend of mine will turn 40 in a couple of weeks. In her younger (should I say wilder, crazier) days, she would drink shots of maple syrup. She said that a shot of maple syrup was like an “apple a day”. I don’t know if she was right about that (although, come to think of it, she didn’t see many doctors in those days), but I do know she had one thing right - she only ever drank pure maple syrup. She knew what she was doing - she was from Vermont, after all.

Being Canadian, I have to agree and fully condone the intake of only pure maple syrup over all artificial forms. I’m not saying that the impostors known as pancake syrups don’t have a place in this world, but they definitely should not be confused with pure maple syrup. They are flavored with a maple flavoring, but in large part are made of high fructose corn syrup. What does that have to do with the sap from a maple tree?

That’s exactly what maple syrup is - the xylem sap from the sugar maple, red or black maple trees. These trees store starch in their trunk and roots in the cold weather, and as the weather warms in the spring, this starch is converted to sugar and rises in the sap of the trees. The trees are tapped to extrude the sap, at which point it does not resemble what we know as maple syrup. It has to be boiled and the water evaporated in order to concentrate the sap into what we lovingly pour all over our pancakes. In fact, it takes 20 - 50 liters of sap to make just 1 liter of maple syrup. Hence, pure maple syrup comes along with a high price tag, which makes it tough to grab the pure maple syrup off the grocery store shelf over the cheaper artificial versions sitting right beside, but it truly is worth it! In the same way that real Parmesan cheese is far better than the version of “cheese” that comes in a green can, the flavor of pure maple syrup is leaps and bounds above pancake syrup. Just ask those who know - the Quebecois. The province of Quebec makes 75% of the world’s maple syrup and the Quebecois refer to artificial syrup as “sirup de poteau” or “pole syrup”, implying that it was acquired by tapping a telephone pole! Saucy folk, those Quebecois!

Maple Syrup is one of very few genuinely North American agricultural products not introduced by Europeans, and in Canada, as in Vermont, New York, Maine, New Hampshire, and other states that produce maple syrup, it is taken seriously. In these places, people care not just about whether the syrup is pure or not, but also about the grades of maple syrup they use. Lighter versions, like Canada#1 Extra Light (AA), Canada #1 Light (A), or USA Grade A Light Amber (fancy) are used at the table, but don’t have a strong maple flavor. True lovers of maple syrup will pride themselves in using Canada #1 Medium (B) or even Canada #2 Amber (C), USA Grade A Medium Amber or Dark Amber. Then there are even darker grades of syrup, like Canada #2 Dark (D) or USA Grade B, but these are generally used in cooking and baking.

Speaking of cooking and baking, maple syrup is a good substitute for sugar in many applications. It is about three times as sweet as sugar, so when substituting, use 3/4 cup of maple syrup for every 1 cup of sugar. If baking, you’ll also want to reduce the largest quantity of liquid in the recipe by 3 tablespoons for every cup of maple syrup used, and check your finished product a little sooner since maple syrup browns quickly. It may sound complicated at first, but it really isn’t. I particularly like the sweet flavor that maple syrup imparts to foods. It is sweet, but it seems to me to be a “smoother sweet” than that of refined granulated sugar.

Here are a couple of recipes that use maple syrup. The first is a vegetarian chili recipe that combines the spice of jalapeño, cayenne pepper and chili powder with the sweetness of maple syrup. This is a feel-good chili that leaves you feeling satiated without feeling like you need to lie down for a while.

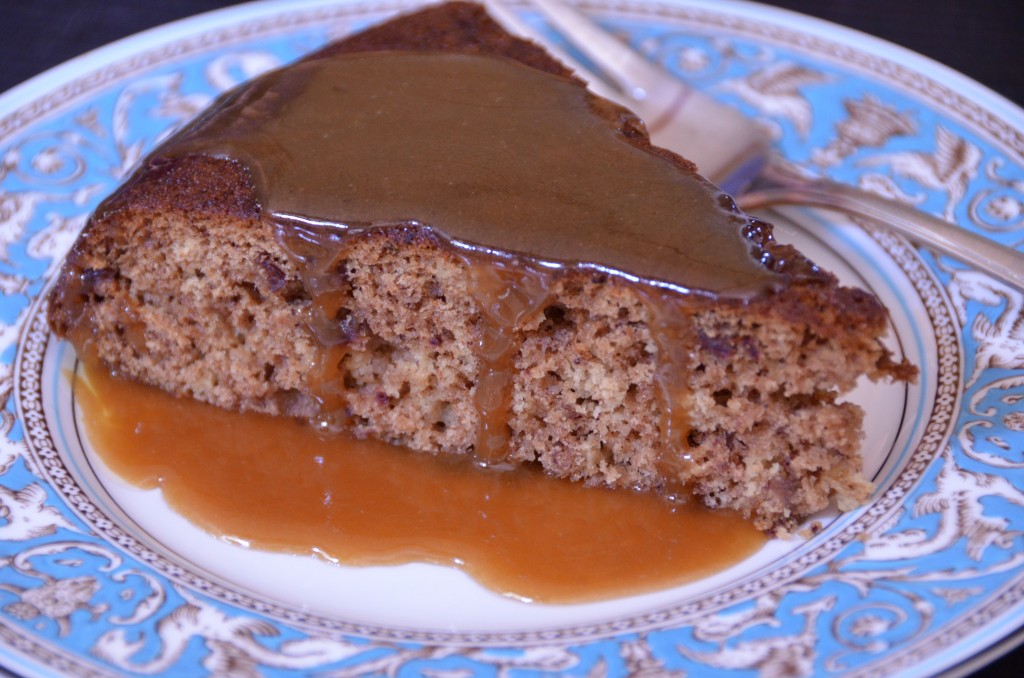
The second recipe is a favorite dessert of mine. It’s name, Pudding Chomeur, comes from the Quebecois word for ‘unemployed’. In the land where maple syrup was plentiful and not expensive, this was a dessert that could be whipped up for very little and believe me, a little goes a LONG way! I’ve tried several different versions of Pudding Chomeur, but this is my favorite so far. Credit goes to Gourmet Magazine who adapted this recipe from a very well known restaurant in Montreal called “Au Pied du Cochon”. Try this one - delicious!

Maple syrup should be a staple pantry item in everyone’s kitchen. Incorporate it wherever you think you’d like a little sweet flavor - a smooth sweet flavor. You’ll be surprised at the number of places you can enjoy its flavor. Once you’ve converted to the faithful of those who believe in using only pure maple syrup, you might even enjoy it in a shot glass!

Vegetable Chili with Maple Syrup

Serves 4 - 6

Bowl of colorful chili in brown bowl with spoon. Dollop of sour cream on top.

Ingredients:

  • 1 tablespoon olive oil
  • ½ cup chopped onion
  • 2 cloves garlic, minced
  • 2 carrots, sliced ¼-inch thick
  • 1 red pepper, chopped
  • 1 yellow pepper, chopped
  • 1 green pepper, chopped
  • 1 jalapeno pepper, chopped
  • 1 zucchini, chopped
  • 1 yellow squash, chopped
  • 4 ounces button mushrooms, quartered
  • 2 tablespoons chili powder
  • 1 tablespoon ground paprika
  • ½ teaspoon dried oregano
  • ½ teaspoon ground cinnamon
  • 1 teaspoon salt
  • pinch – ¼ teaspoon cayenne pepper (depending on how spicy you’d like it)
  • pinch ground cloves
  • 1 28-ounce can whole plum tomatoes, diced or crushed by hand
  • 2 tablespoons maple syrup
  • 1½ cup chickpeas, cooked or canned
  • 1½ cup red kidney beans, cooked or canned
  • chopped fresh cilantro (or parsley)
  • sour cream (optional)
  • Cheddar cheese, grated (optional)

Directions:

  1. Heat a large Dutch oven over medium-high heat. Add the olive oil and sauté the onion, garlic, carrots, peppers for 8 minutes. Add the zucchini, yellow squash and mushrooms and continue to cook for another 6 minutes.
  2. Add the oregano, cinnamon, paprika, chili powder, ground cloves and cayenne and stir to mix well, continuing to cook for another minute or two.
  3. Add the tomatoes and maple syrup and bring everything to a simmer. Cook over medium-low heat for 35 minutes, or until all the vegetables are tender.
  4. Stir in the beans and simmer for another 10 minutes. Then season with salt and more cayenne pepper if desired.
  5. Garnish with cilantro (or parsley if preferred) and serve with a dollop of sour cream and some grated Cheddar cheese.


Pudding Chomeur

Serves 6

Close up shot of baked pudding in brown ramekin with dollop of sour cream

Ingredients:

  • 1 cup pure maple syrup
  • ¾ cup heavy cream
  • 2 teaspoons cider vinegar
  • pinch of salt
  • 6 tablespoons butter
  • 1/3 cup granulated sugar
  • 1 egg
  • ½ teaspoon pure vanilla extract
  • 1 cup cake flour
  • 1 teaspoon baking powder
  • ¼ teaspoon salt
  • sour cream (optional)

Directions:

  1. Preheat the oven to 350º F.
  2. Combine the maple syrup, heavy cream, cider vinegar and salt in a small saucepan and bring to a boil. Remove from the heat.
  3. Cream the butter and sugar together with an electric mixer until light and fluffy. Add the egg and vanilla extract and beat until just combined.
  4. Add the flour, baking powder and salt and mix until just combined (the batter will be thick).
  5. Pour 1/3 cup of the maple syrup mixture into a 9-inch square cake pan. Divide the batter into 6 mounds and place them in the cake pan, spaced evenly. Pour the remaining maple syrup mixture over and around the mounds.
  6. Bake for 25 to 30 minutes or until the top is golden and firm to the touch. Serve warm with a dollop of sour cream.


Oct 302011
 

It’s that time of year. The time of year when I start planning my Thanksgiving meal (my second Thanksgiving meal that is, since Canada’s Thanksgiving was almost a month ago and I get to enjoy both!). Yes, I’ll probably have turkey and yes, I’ll probably brine it. That’s a given. To me, the most interesting and exciting parts of Thanksgiving are the side dishes that go along with the turkey. So, at this time of year, I start experimenting with different Thanksgiving-appropriate vegetables. This week, I think I’ve not only hit on a winner for my Thanksgiving meal, but I’ve decided this is my new favorite winter squash - delicata squash.

Now, for those of you who don’t know me well, that is quite a statement for me to make. My mother probably just fell over! I have never been a lover of squash. In fact, pumpkin can send me into hiding for weeks. However, I’ve grown up and forced myself to embrace squash (I still haven’t quite conquered pumpkin, but I haven’t given up).

a display of delicata squash as a farmers' market

Delicata squash is a lovely pale yellow or cream colored oblong squash with dark green vertical stripes. It ranges from about 5 to 9 inches in length and is usually about 3 inches in diameter. One squash will feed two people easily. Winter squash and summer squash are both available year round. They differ in that winter squash are harvested and eaten when the squash has reached the fully mature fruit stage - the seeds have fully matured and the skin has hardened - while summer squash are harvested when still immature with softer skins and seeds. Winter squash became known as “winter squash” because they can be stored longer than summer squash. They are better “keepers” and can be stored into the winter months.

Now, delicata squash does not keep quite as long as most winter squashes, but how many of us are storing vegetables for months? What I really like about delicata squash is the fact that you don’t have to peel it. The skin is edible and really quite enjoyable. Butternut squash has been popular over the years, but peeling and chopping butternut squash makes it more work in the prep stage and deters many cooks. With delicata squash, you simply cut it into rings or wedges, removing the seeds one way or another and then roast, sauté, steam, or even microwave it.

Here are a couple of recipes to get you started with this fabulous and easy-to-prepare squash. The first is very simple and shows off the flavor of the delicata squash. The second is a little sweeter, but oh so tasty! Whether you’re a fan of the savory or the sweet, one of these recipes is sure to become a favorite of yours!

rings of roasted delicate squash on a white oval plateSimply Roasted Delicata Squash

Serves 4

Ingredients:

2 delicata squash

1 tablespoon olive oil

1 teaspoon chopped fresh thyme

1/4 teaspoon salt

freshly ground black pepper

Directions:

  1. Pre-heat the oven to 400º F.
  2. Starting at the more rounded end of the squash, cut the squash into horizontal slices, about 3/4-inch thick. When you can see the seeds inside, scrape out the seeds with a teaspoon. Then, continue to slice the squash into rings.
  3. Toss the rings of squash with olive oil, thyme, salt and pepper and spread out onto a baking sheet in one layer.
  4. Roast at 400º F for 20 – 25 minutes, or until tender, turning the rings once during cooking.


Wedges of roasted delicate squash with parsleyMaple Roasted Delicata Squash

Serves 4

Ingredients:

2 delicata squash

2 tablespoons butter

2 tablespoons maple syrup

1/8 teaspoon ground cinnamon

1/4 teaspoon salt

freshly ground black pepper

2 tablespoons chopped fresh parsley

Directions:

  1. Pre-heat the oven to 400º F.
  2. Cut the squash in half lengthwise and remove the seeds with a teaspoon. Then, cut each half into about 2 or 3 wedges.
  3. Melt the butter in a small saucepan and mix with the maple syrup and cinnamon.
  4. Spread the squash out on a baking sheet in one layer and brush each wedge with the butter and maple syrup mix. Season with the salt and freshly ground black pepper.
  5. Roast at 400º F for 25 minutes, or until tender. Remove from the oven and sprinkle with parsley.