Aug 052014
 

lime green microwave pressure cookerTradition and routine are strong influences in all we do, including cooking. In the kitchen, traditional techniques often prevail until we see someone doing something different, which opens our eyes.

There’s a Canadian food television show called Pitchin’ In with Toronto Chef Lynn Crawford which I particularly like. In the show, she travels around in search of the freshest ingredients in their place of origin, often relying on the locals to show her how to pick, catch or trap these ingredients. Then, she cooks a meal with the ingredients for all who helped her in the search. One episode featured lobster and Chef Lynn goes lobster fishing in the Bay of Fundy to catch some of the world’s best. Then, before she prepares it, she asks how the locals like to cook their lobsters. To her (and my!) surprise, they say their best way of preparing lobster is in the microwave! She gives it a try and actually likes it!

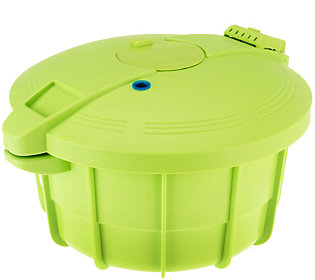
It’s very easy to fall into a philosophy of “the old way is the best way” when cooking. These days I try to keep my eyes and mind open to new and different cooking techniques, and never has that been more true for me than with the microwave pressure cooker. I’m very familiar with pressure cooking, having written a book full of pressure cooker recipes, but rarely used my microwave for more than popcorn or re-heating leftovers. It’s a crying shame, really, to have an appliance in the kitchen with so much to offer and do so little with it. Very few people use their microwave to its fullest capacity because they’ve never been able to get great results out of it. Foods tend to cook unevenly in the microwave and come out either dry or rubbery. Now, those who know me know that I approach new kitchen gadgets with a little skepticism. I really need to be convinced that they deserve a spot in my kitchen. When the microwave pressure cooker came into my life, I remembered Chef Lynn Crawford and the lobster and decided I needed to be open minded. What I discovered is that this cooking tool manages to use the speed of microwave cooking but gives you the results of pressure cooking - tender, juice, moist and delicious meals. It’s a win-win!

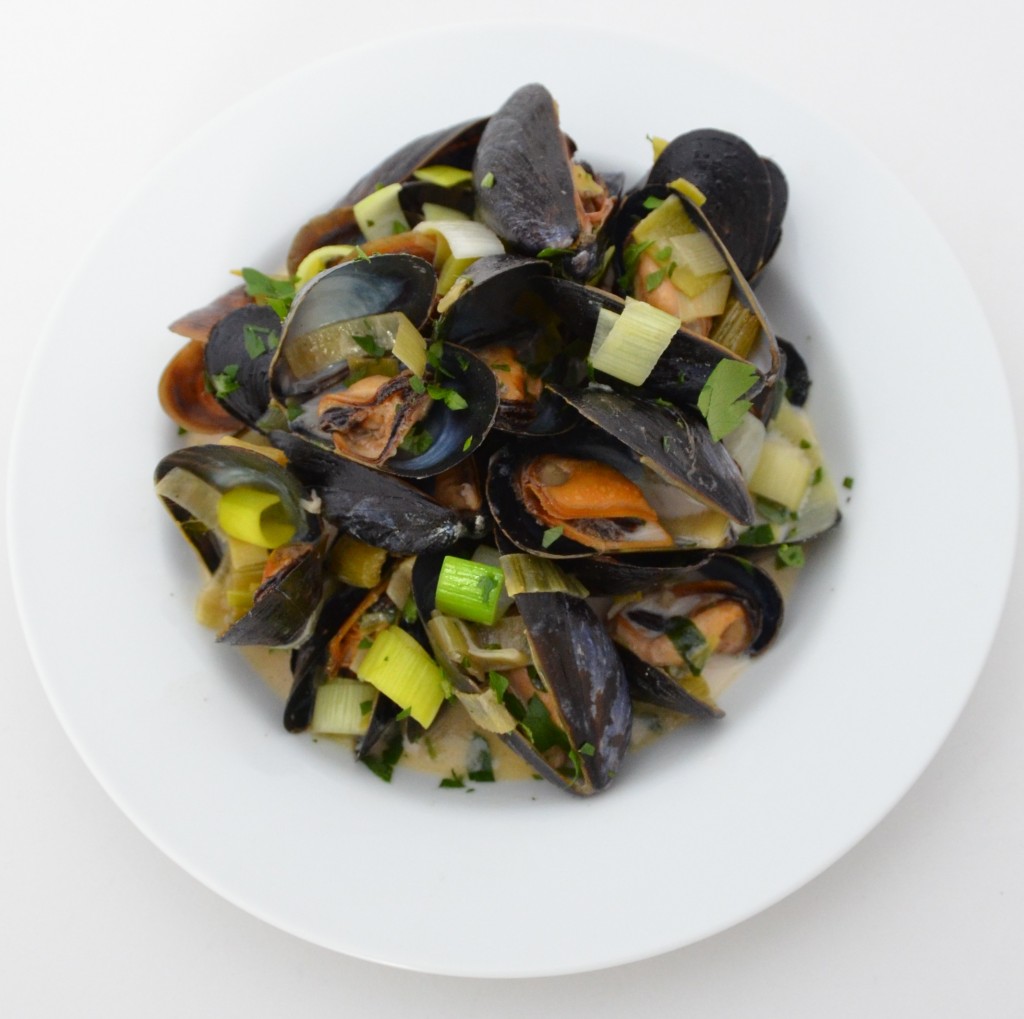
So, when it came to cooking mussels, naturally my first thought was to cook them on the stovetop in a lidded pot. But then… if lobster in the microwave can be delicious, why not try the microwave pressure cooker to cook mussels? It was quick and easy, but the best part was that they came out tasting delicious. Here’s the recipe:

Mussels with Beer, Leeks and Cream
white bowl full of mussels with bits of leek scattered. Cream sauce in bottom of bowl.
Serves 1 or 2

Ingredients:

  • 4 stalks celery, diced
  • 2 tablespoons butter
  • 1 pound (450 g) fresh mussels, scrubbed and beard removed
  • 1 leek, washed, trimmed, and thinly sliced
  • 1 12-ounce (350 mL) bottle of Belgian-style or Trappist-style beer
  • ½ cup (120 mL) heavy cream
  • salt and pepper, to taste
  • 1 tablespoon chopped fresh parsley
  • 1 lemon wedge

Directions:

  1. Place the celery and butter in the Microwave Pressure Cooker and cook, uncovered, for 3 minutes on HIGH power.
  2. Add the mussels, leek and beer to the Microwave Pressure Cooker.
  3. Place the lid on the Microwave Pressure Cooker and lock into place.
  4. Cook the mussels on HIGH for 10 minutes.
  5. When the time is up, let the pressure come down naturally by leaving the lid on the cooker until the white pressure indicator has dropped.
  6. Stir in the heavy cream. Season to taste with salt and pepper. Garnish with parsley and some squeezed lemon and serve with warm, crusty bread for dipping.

Interested in learning more about the Microwave Pressure Cooker? Tune in to QVC on Wednesday, August 6th. I’ll be there!


ML


Jul 032014
 

Tuna Poke 1

Fish is good food! We all know that. It’s good for us, full of omega-3 fatty acids, a great source of protein and easy to digest. You can tell fish is good for you because of how you feel after eating it - fresh, clean, healthy. But more than just being good for you, fish is delicious! I love fresh fish, but I especially love fresh raw fish. Sushi has become a regular meal for me, but recently I’ve found a new love for a similar raw fish preparation - Hawaiian Ahi Poke. Poke is Hawaiian for “to slice or cut” and Poke is an appetizer prepared by cutting sashimi grade Yellowfin Tuna into small cubes or pieces and combining it with sesame oil, soy sauce, some chili spice and various other ingredients. The biggest challenge to making Ahi Poke is getting the freshest Yellowfin Tuna. Of course, you know I have the answer, because you can actually get this sashimi grade fish from my friends at Anderson Seafoods, already prepared and cut into cubes for you. While I do love Ahi Poke, these Yellowfin Tuna Cubes are actually very versatile and you can make delicious Ahi ceviche tacos, spicy tuna bites and pot stickers, a tuna putanesca sauce for spaghetti and seared sesame tuna with these cubes. The Ahi Poke dish takes about 5 minutes to prepare from start to finish, and will make a statement at any dinner party, or just makes for a delicious snack for you. Give it a try!

Want to see more of the Ahi Tuna Cubes? Check out QVC on Friday, July 4th at 6pm ET.


Hawaiian Ahi Tuna Poke

Serves 6 as a small appetizer

Ingredients:

  • 4 ounces Anderson Seafoods’ Ahi Tuna Cubes
  • 2 tablespoons chopped green onion
  • 2 teaspoons soy sauce
  • 1/8 to ¼ teaspoon sesame oil
  • ¼ teaspoon chili garlic sauce
  • ¼ teaspoon honey
  • 1 to 2 teaspoons sesame seeds

Directions:

  1. Combine all ingredients and toss gently.
  2. Serve on small appetizer spoons, or with tortilla chips to scoop, or lettuce cups to wrap around the tuna.
Jun 252014
 

Spaghetti 2

Today I have the good fortune to launch yet another delicious item on QVC from my friends at Anderson Seafoods. This time, it’s not fresh fish (although you can see their full assortment of fresh (never frozen) fish on their website at any time), but a medley of delicious seafood, including shrimp, wild caught bay scallops, squid rings and wild Alaskan cod! I’ve been busy cooking this seafood up in a number of ways and there are so many things I love about this seafood medley.

First of all is its versatility. I’ve made pastas, stews, fried appetizers, a pot pie, and even a salad with the mix, but you could also make tacos or fajitas, throw it onto a pizza, and of course grill it up in a grill basket to accompany just about anything. I love the versatility of this seafood and how quickly you can put a great meal together using it as the main ingredient.

Secondly, it’s such a quick fix! In no more than two minutes of cooking time, everything is cooked up and ready to be served. It’s great when you need to put dinner together quickly and the end result is delicious and special - not your everyday quick fix!

I also love the size of all the pieces of seafood. Squid cooks very quickly and the shrimp, bay scallops and cod pieces are the right size to accompany the squid. Together all the different seafoods are complimentary to each other and sized appropriately not only for each other, but also for eating. They are the perfect bite-size.

Last, but definitely not least, is the convenience of this medley. When making a seafood dish, you often have to go and buy all the different seafoods separately. Depending on how they are sold (shrimp in one pound bags, for instance), you may have to buy more than you need for a particular dish. Anderson, on the other hand, offers the medley in one-pound bags with the four different types of seafood making up roughly 25% of that pound. Having a pound or two of this in the freezer is a cook’s safety blanket - they defrost quickly, cook quickly and can make an impressive last minute meal!

Interested? You should be!

Quick and Easy Seafood Pasta with Black Pepper and Lemon

Serves 2 to 4

Ingredients:

  • ½ pound dried spaghetti
  • 1 pound Anderson Seafoods’ seafood medley, thawed, well drained and patted dry
  • 2 tablespoons olive oil
  • 1 lemon, zest and juice
  • ¼ cup chopped fresh parsley
  • 2 tablespoons chopped fresh chives
  • salt and freshly ground black pepper

Directions:

  1. Bring a large stockpot of salted water to the boil. Add the pasta and cook according to the package directions.
  2. While the pasta is cooking, pre-heat a large sauté pan or skillet over medium-high heat. When the pasta has only 2 minutes of cooking time left, add the olive oil to the skillet and toss in the seafood medley. Cook, tossing regularly, for 1 minute and then remove the skillet from the heat.
  3. Drain the pasta, reserving ½ cup of the pasta liquid. Transfer the drained pasta to the skillet and add the lemon zest, herbs, salt and lots of freshly ground black pepper. Toss well and add lemon juice and more olive oil to taste. Add a little pasta water if necessary to loosen the pasta and seafood.


Click for recipes for Seafood, Chorizo and Corn Salad; Salt and Pepper Fried Seafood; Seafood Potpie with Puff Pastry Top; Seafood Stew with Fennel, Tomatoes and Potatoes.

Mar 112014
 

What a treat!

Close up shot of salmon candy on a green plate

If you’ve never heard of salmon candy before, I’m not really surprised. It’s not something you see every day. You won’t find it in the grocery store, or even in most specialty food stores. It started out as a way for Native North Americans in the Pacific Northwest to preserve their salmon, but now it’s just a super tasty and very addictive snack! Salmon candy is made from the belly of Pacific salmon. The salmon is broken into chunks and then placed in a salt brine with sweet ingredients like honey, molasses and brown sugar for several hours. After brining, it is hot-smoked slowly until fully cooked. Salmon jerky is smoked and dried so much that it is chewy and “tuggable”, but salmon candy is soft, sweet, smoky and just plain delicious.

I had the pleasure of working with some salmon candy this week from my friends at Anderson Seafoods and found so many different ways to use it. It works in pasta, in scrambled eggs, in a green salad, as an hors d’oeuvre, with hot potato salad, with lentils and green beans… the list is endless. I loved using it in so many different ways, but I have to admit… my favorite way to eat it was just on a toothpick! Leave it out on a platter of nibbles, and I bet it’s the first to go!

Lucky for you, you’ll be able to get your hands on some of this high-end salmon delicacy through QVC on Wednesday, March 12th at 4pm ET. Don’t miss your chance!

(click on the links above for recipes!)


Feb 152014
 

Steelhead trout with melted butter, honey bell zest and parsley on top. Roasted fennel and carrots and broccoli in the background.


A fillet of Steelhead trout looks a lot like a fillet of salmon. Why is that? Well, because Steelhead is a fish that acts like salmon: it eats krill in the ocean and migrates from the ocean into freshwater to spawn. As a result, it has an appearance and flavor much like salmon. What’s the advantage of Steelhead trout? It’s a responsible choice with respect to sustainable fishing, is ranked as a “best choice” on the Monterey Bay Aquarium Seafood Watch List and is less expensive than salmon!

A Honeybell looks a lot like an orange. Why is that? Because a Honeybell is a citrus fruit hybrid cross between a Dancy tangerine and a Duncan grapefruit. It looks like a bright orange bell shaped orange. What’s the advantage of a Honeybell? It’s unbelievably sweet and is filled with juice. While it is delicious to eat, it produces so much juice and its zest is such a beautiful color, that it is a joy to cook with.

In this recipe, I put these two ingredients together and it was a lovely match. A little bright, sunshine-of-a-meal in the middle of winter.


Steelhead Trout Poached in White Wine with Honeybell Butter

Serves 2

Ingredients:

  • 2 cups white wine
  • 2 bay leaves
  • 1 tablespoon peppercorns
  • ½ small onion, sliced into thin rings
  • 4 sprigs fresh thyme
  • 1 Honeybell
  • 3 tablespoons butter, softened
  • 2 fillets Steelhead trout
  • salt and freshly ground black pepper

Directions:

  1. Combine the white wine, bay leaves, peppercorns, onion slices and fresh thyme sprigs in a sauté pan. Slice half the Honeybell into slices and add the slices to the sauté pan. Bring the liquid to a simmer and simmer very gently for 10 minutes.
  2. While the poaching liquid is simmering, season the trout with salt and set it aside.
  3. Make the Honeybell butter. Zest and juice the remaining half a Honeybell and combining the zest and juice with the softened butter in a small bowl. Beat together until well mixed and season to taste with salt and pepper. Shape the butter into two flat disks or other shape and chill in the fridge until ready to serve.
  4. Then gently place the fish into the sauté pan. Top the pan up with hot water so that the fish is covered. Poach, with the liquid simmering very gently, for 6 minutes, or until the fish is firm to the touch.
  5. Remove the fish from the pan with a spatula and plate with a piece of the Honeybell butter on top.

For more recipes using Steelhead Trout, visit my QVC recipe page here.

May 182013
 
Spaghetti with tuna, tomatoes, capers, basil, olives in a white bowl

Spaghetti with Tuna Putanesca Sauce

As I often have the pleasure to do, I’ve been eating a lot of fresh fish from Anderson Seafoods lately. The fish from Anderson Seafoods is one of my favorite food items to present on QVC. The fact that it arrives at my door fresh (never been frozen) always astonishes me, and that freshness comes through when you cook and eat it. Absolutely delicious!

Then there’s the health aspect. No other part of my work life leaves me feeling as healthy as working with Anderson Seafoods! Continue reading »

Apr 292013
 

Just typing the words “grilling Rockfish” makes it feel like summer. For instance,

“What are you doing for dinner?”

“Me? Oh, I’m grilling Rockfish.”

The words immediately conjure up images of backyards, hot grills, fresh fish and delicious meals. It’s not just the words, however, that make you want to put on a pair of shorts, lie back in a lounge chair and grab a glass of white wine. If you actually get out there and grill some Rockfish you’ll see that the feeling of summer will be upon you in no time. I experienced this over the weekend and can testify to its truth.

a piece of grilled Pacific Rockfish with colorful salsa - orange segments, red pepper, herbs - on top

Grilled Pacific Rockfish with a Citrus-Herb Salsa

For those of you unfamiliar with Rockfish, there are more than 70 species of Rockfish living off the West Coast of North America. Pacific Rockfish is a firm, lean, mildly-flavored, pink-fleshed fish. It is sometimes marketed as Snapper, Red Snapper, or Pacific Snapper on the west coast. (True Red Snapper, however, is an Atlantic fish.) Pacific Rockfish is a very approachable fish. It’s delicious with an almost sweet flavor, tender and flakey, and appeals to both the fish-lover and those who have just started to incorporate fish into their weekly diet (which we should all be trying to do!).

There are so many ways to prepare Pacific Rockfish. It’s easy and versatile. Continue reading »

Oct 192012
 

Salmon with Potatoes and Peas in a Ginger Broth (click for recipe)

Years ago I worked as a cook in a couple of restaurants in Les-Baux-de-Provence, France. During my time there, I used to go into a nearby village on saturday mornings to visit the local market. I didn’t buy food at the market - after all, I worked in a fully stocked restaurant and was living in quarters without a kitchen. Instead, I would just sit and watch the women who ran the fish stall. There were three of them working in a caravan with an open side, and they spent the whole morning preparing the fish for sale - cleaning, de-scaling, breaking down whole fish into fillets, doing all things to all sorts of fish. They were masterful with their knives, slicing the fish with grace and precision. They worked quickly and quietly as they prepared their display. I admired their skill and thought at the time that I might like a future working as a fishwife. Strange to some, I suppose, but that’s what I thought at the time.

Well, time passes and plans change. My career path has never been predictable, and I never did become a fishwife. Perhaps now, however, I’ve come as close as I ever have to realizing my dream of selling fish. No, I’m not actually fishing, cleaning or preparing the fish, but for the first time I’m about to provide access to the freshest, tastiest fish many people will ever taste (unless they visit a seaside town and buy fish off a boat). Here’s how I came to this… Continue reading »