Sep 232014
 

sliced chicken breast on a white plate with greens in background and tomato balsamic sauce on top


Making a pan sauce is one of my favorite things to do when I’m cooking. It’s quick, easy, delicious and finishes off the dish nicely. Plus, it forces you to let the meat rest while you make the sauce, and letting the meat rest is so important to keep it juicy and moist. But wait… there’s more… making a pan sauce is like doing half the dishes - by deglazing, you clean off the bottom of the pan as you incorporate all those tasty brown bits into the sauce AND making the sauce doesn’t make a second pan dirty. It’s a win-win-win-win!

Need a little tutorial on making a pan sauce once you’ve finished cooking your steak, chicken, pork or fish? It’s super easy. You just need to remember three (or maybe four) things:

  • Add Flavor: You start by adding some onion, shallots, garlic, and/or herbs to give the sauce some flavor.
  • Add Liquid or something acidic: This will be the main flavor of the sauce - wine, stock, juice, tomatoes
  • Let it Reduce: The flavors need time to concentrate and blend and the sauce needs to thicken slightly, so let the mixture simmer and reduce for 2 or 3 minutes, or until you feel it looks and tastes right.
  • Finish the Seasoning: After you taste it above, you might think it’s perfect or you might think it needs something - a pinch of salt, a nub of butter to mellow it all, a squeeze of lemon to brighten it. Season it up and serve it!

Here’s a 10-minute lesson on making a pan sauce:


Chicken Breasts with Tomato Balsamic Sauce

Serves 4

Ingredients:

  • 4 (6-ounce) chicken breasts
  • salt and freshly ground black pepper
  • olive oil
  • 2 shallots, thinly sliced
  • 1 clove garlic, smashed
  • ¼ cup balsamic vinegar
  • 2 cups cherry tomatoes, quartered (or chopped fresh tomatoes)
  • ¼ cup chopped fresh parsley or basil leaves

Directions:

  1. Pre-heat a large non-stick skillet over medium-high heat and season the chicken with salt and pepper. Add olive oil to the skillet and sear the chicken breasts, cooking for about 3 to 5 minutes on each side (depending on thickness), or until firm to the touch. Remove from the skillet and set aside.
  2. Add the shallot and garlic to the skillet and cook for two minutes. Add the balsamic vinegar and simmer until it has almost disappeared. Immediately add the tomatoes and toss well. Cook until the tomatoes soften slightly – just a minute or two. Toss in the basil or parsley and season to taste with salt and pepper.
  3. Pour over the chicken and serve.


Aug 052014
 

lime green microwave pressure cookerTradition and routine are strong influences in all we do, including cooking. In the kitchen, traditional techniques often prevail until we see someone doing something different, which opens our eyes.

There’s a Canadian food television show called Pitchin’ In with Toronto Chef Lynn Crawford which I particularly like. In the show, she travels around in search of the freshest ingredients in their place of origin, often relying on the locals to show her how to pick, catch or trap these ingredients. Then, she cooks a meal with the ingredients for all who helped her in the search. One episode featured lobster and Chef Lynn goes lobster fishing in the Bay of Fundy to catch some of the world’s best. Then, before she prepares it, she asks how the locals like to cook their lobsters. To her (and my!) surprise, they say their best way of preparing lobster is in the microwave! She gives it a try and actually likes it!

It’s very easy to fall into a philosophy of “the old way is the best way” when cooking. These days I try to keep my eyes and mind open to new and different cooking techniques, and never has that been more true for me than with the microwave pressure cooker. I’m very familiar with pressure cooking, having written a book full of pressure cooker recipes, but rarely used my microwave for more than popcorn or re-heating leftovers. It’s a crying shame, really, to have an appliance in the kitchen with so much to offer and do so little with it. Very few people use their microwave to its fullest capacity because they’ve never been able to get great results out of it. Foods tend to cook unevenly in the microwave and come out either dry or rubbery. Now, those who know me know that I approach new kitchen gadgets with a little skepticism. I really need to be convinced that they deserve a spot in my kitchen. When the microwave pressure cooker came into my life, I remembered Chef Lynn Crawford and the lobster and decided I needed to be open minded. What I discovered is that this cooking tool manages to use the speed of microwave cooking but gives you the results of pressure cooking - tender, juice, moist and delicious meals. It’s a win-win!

So, when it came to cooking mussels, naturally my first thought was to cook them on the stovetop in a lidded pot. But then… if lobster in the microwave can be delicious, why not try the microwave pressure cooker to cook mussels? It was quick and easy, but the best part was that they came out tasting delicious. Here’s the recipe:

Mussels with Beer, Leeks and Cream
white bowl full of mussels with bits of leek scattered. Cream sauce in bottom of bowl.
Serves 1 or 2

Ingredients:

  • 4 stalks celery, diced
  • 2 tablespoons butter
  • 1 pound (450 g) fresh mussels, scrubbed and beard removed
  • 1 leek, washed, trimmed, and thinly sliced
  • 1 12-ounce (350 mL) bottle of Belgian-style or Trappist-style beer
  • ½ cup (120 mL) heavy cream
  • salt and pepper, to taste
  • 1 tablespoon chopped fresh parsley
  • 1 lemon wedge

Directions:

  1. Place the celery and butter in the Microwave Pressure Cooker and cook, uncovered, for 3 minutes on HIGH power.
  2. Add the mussels, leek and beer to the Microwave Pressure Cooker.
  3. Place the lid on the Microwave Pressure Cooker and lock into place.
  4. Cook the mussels on HIGH for 10 minutes.
  5. When the time is up, let the pressure come down naturally by leaving the lid on the cooker until the white pressure indicator has dropped.
  6. Stir in the heavy cream. Season to taste with salt and pepper. Garnish with parsley and some squeezed lemon and serve with warm, crusty bread for dipping.

Interested in learning more about the Microwave Pressure Cooker? Tune in to QVC on Wednesday, August 6th. I’ll be there!


ML


Nov 282012
 

An apple pie on a cooling rack with two red apples in the background


There are two things I love about pie - the pastry and the filling.

Ok, so I love everything about pies! After all, what’s not to love? What could be better than a warm, flakey crust that breaks gently under your fork paired with a warm sweet fruit filling? It’s a dessert that pleases your heart as much as your taste buds. It’s sort of the chicken noodle soup of the dessert world.

If I had to choose which is more important to me in a pie, the pastry or the filling, I’d probably be forced to go with the pastry (although the two components truly are inseparable). I like a pastry made of butter, rather than shortening. The butter gives the pastry great flavor and a crisp texture. Shortening does make a flakey crust, but I can’t go without the flavor of butter. Sometimes I do compromise, however, and accept a pastry made of both.

The rule to making pastry is simple – keep everything cold. The goal is to work butter into the dough without completely blending it into the flour. In a finished pastry, you should still be able to see chunks of butter. Those patches of butter will separate the proteins in the flour when baked, making it more like flaky pastry than chewy bread. By keeping the butter cold, you run less risk of blending it into the flour. By using ice-cold water, you also increase your chances of keeping the butter in small chunks.

How the pastry is baked is critical. It’s easy to get the top crust to look perfectly golden brown, but it’s the bottom crust that needs help cooking through and crisping up. It is the bottom crust after all that is sitting at the bottom of a pie pan with moist fruit filling piled on top. You can see how it would be a challenge to ensure the bottom crust is cooked through and has that prized pie texture. There are a few things a home baker can do to get the pastry cooked properly on the bottom of a pie. Continue reading »

Nov 192012
 
a whole roast turkey on a white platter with oranges and herbs around it.

@ Bochkarev Photography

It’s the monday before American Thanksgiving and the plans for this thursday’s meal are under way. As I write this, the turkey stock is simmering on the stovetop and the turkey brine is cooling on the counter. I’ve been brining my Thanksgiving turkeys for several years now. It’s easy to do and really does result in a deliciously moist turkey. All you need is a little forethought and some room in your refrigerator.

To brine your turkey just means to submerge it in a salty solution over a period of time. What happens when you brine is all science. The brine works to flavor the turkey through the process of osmosis. The salty solution initially draws moisture out of the turkey, but then, the salty solution gets drawn back into the turkey, taking along with it all the great flavors of whatever you’ve put into the brine. The salt denatures the cells of the turkey meat, making them better able to hold moisture. And so, after some time in the brine, those cells can actually hold 10 - 15% more water than they did before brining.

There are a couple of simple ratios to remember when you’re brining.

  • Use 1 cup of table salt (or 1.5 cups kosher salt because kosher salt has a higher volume by weight) for ever 1 gallon of water you need to cover the turkey.
  • Brine the turkey 1 hour for every pound of turkey.

At it’s most basic level, a brine could consist of just water and salt, but since you’re going to the effort of brining, why not put some other flavors in there that will help season the center of your Thanksgiving plate? Here’s what I use in a brine: Continue reading »

Nov 102012
 

Last week, I found myself inundated with salad greens. Superstorm Sandy left my friends without power, and I inherited all their perishable food so that it wouldn’t go to waste. For someone who cooks for only one or two most of the time and shops every day for whatever it is I want that night, inheriting the weekly produce for a family of three was a little overwhelming. I had a large tub of mixed greens (you know - the size that you can wash a baby or small dog in!), a huge bag of spinach, and a couple of heads of radicchio, all on top of the usual box of greens and other salad ingredients that I had on hand for myself. It looked like salad was going to be an “every meal accompaniment” - with eggs for breakfast, as an entrée for lunch and along side every dinner - for as long as they would last.

The good news was… I love salad. I truly do. I have a fondness for foods that are so variable (like omelets, pizza, pastas). You can add any mixture of ingredients and dressings to a bowl of greens and change the salad completely from what it was the last time you had it. All this salad got me thinking about vinaigrettes and in talking with my friends about my overabundance of salad greens, I realized that the simplicity of a vinaigrette often eludes the home cook. So, I thought I’d put together some tips for making a perfect vinaigrette. Continue reading »

Sep 142012
 

Fall is almost here. The days are getting shorter, but now that summer is over, we seem to have more obligations to fit into those shorter days - school schedules, homework, after-school sports and groups, working out, work commitments, and soon we’ll have holiday commitments too. The list can go on and on. Somewhere in there, we also have to put dinner on the table and hope that it makes at least ourselves happy and healthy, if not a whole family. That can be a lot of pressure. What to do?

Actually, pressure just might be the answer.

Last winter I started writing my second cookbook and devoted it to pressure-cooking. Continue reading »

Nov 062011
 

I’ve been cooking in a clay baker for years. I love the way the foods come out of it deliciously moist, the way the aroma of the food wafts through the house as it cooks, and frankly, I just love the way a clay baker looks. Recently, I’ve been cooking in a clay baker a lot because I have a recipe project for one on the go. That’s why the ad for roasting a chicken in clay in the Williams-Sonoma catalogue caught my eye.

Williams-Sonoma wasn’t advertising a clay baker, however. They were selling actual clay to mold around your chicken and completely seal it in while it roasts. The clay comes raw and bakes into a hard shell while the chicken cooks inside. The only way to retrieve your beautiful roast chicken is to break the clay - quite the table-side presentation, or at least just some fun for the cook in the kitchen. I couldn’t resist and decided to give it a try.

Williams-Sonoma's Roasting Clay kit

Now before I go any further, I should let you know that this was not an inexpensive chicken dinner. The clay kit was about $15 and on top of that I spent a lot of money on the best “organic-no antibiotic-field roaming-vegetarian diet-chicken” I could find. The chicken alone, if you can believe it, was $18! I had decided that if I was going to give this clay a good test, I was going to give it the best shot possible, plus I was willing to pay for the entertainment value.

The process was relatively easy. I stuffed a flavorful butter mixture underneath the skin of the chicken on the breast and leg (2 tablespoons butter, 1 teaspoon chopped fresh thyme, 1 teaspoon minced garlic, 1 teaspoon lemon zest, 1 teaspoon kosher salt). Then, I rubbed more butter on the outside of the chicken, stuffed the lemon halves inside the cavity, and wrapped the chicken in parchment paper. The clay came in two slabs, which I rolled out into large ovals. One slab went on the bottom of the sheet pan lined with parchment paper. The wrapped chicken lay on this slab of clay with the parchment seam down.

chicken wrapped up and ready to encase in clay

The second slab of clay was laid over the top of the chicken and then the edges of the clay were sealed together. The finished product was like a huge beef Wellington! I sent the clay vessel into a hot 425 degree F oven for 1 hour 20 minutes.

the parchment paper makes transferring the clay to the chicken easy

peeling the parchment paper off...

ready for the oven...

Now, I think if I were to do this again, I’d make a bigger effort to decorate the clay on the outside somehow - use clay scraps to make leaves or some sort of decoration, or write a little message in the clay - “Bon Appetit!” perhaps, or some special message? The clay baked into a hard shell and remained a light gray color. Still, despite the lack of decoration it was sort of exciting to pull the now hardened egg out of the oven. It rested for 15 minutes - enough time to pull the rest of the meal together.

out of the oven and resting

Then, the best part… I broke it open. It broke easily and the pieces of clay were warm but cool enough to move away and reveal the chicken wrapped in parchment inside.

breaking the mold

you can see why you wrap the chicken in parchment paper - to avoid the clay dust getting on your dinner

first rips to reveal the brown chicken

The best part didn’t last long and soon the chicken was entirely unwrapped. What was really noticeable once all the clay was removed were all the juices from the chicken in the bottom of the clay mold. Yum! The chicken was lightly browned and amazingly juicy. We ate.

it was lightly browned, very tasty and extremely juicy

Final benefit… a clean oven and no roasting pan to clean. I just threw the broken clay away.

So, was it the $18 chicken that tasted so good, or was it the herb butter under the skin that made it so flavorful, or was it indeed the clay baking technique that gave the chicken an incredible juiciness? Who’s to say, maybe all three. I do know that baking (and breaking) a chicken has never been quite as entertaining. It was fun and it was memorable. Now I can honestly say “Boy! When I baked that chicken, I broke the mold!” :)


Oct 162011
 

I’ve been cooking for years now, both professionally and for personal enjoyment. What never ceases to amaze me, and one of the things I love most about cooking, is that I am constantly learning new things and changing the way I cook. I eat out at restaurants a lot and learn about new ingredient combinations. I read a lot of food magazines and books and learn about new cooking techniques and new foods on the market. I play with ethnic dishes when I cook and learn about entirely different cuisines. Finally, I just cook a lot and I learn through experience about what works and what enhances a meal. This past year, the one lesson that has affected me the most involves my use of fresh herbs.

Using fresh herbs is not new to me. I’ve always preferred to cook with fresh herbs over dried herbs for the most part. I like the fresh, bright and pure flavor that fresh herbs provide. This year, however, I’ve started adding way more than I’ve used before. Part of the reason for that is my herb garden. Any gardener knows that pruning and pinching herbs is good for the plant and generally helps it grow. So, this past summer, every time I went into my garden to cut herbs for a meal, I cut more than I needed. Then, I started using more than I felt I needed, and the flavors really started to shine and complement the dishes I was making. They became a critical ingredient and flavor of their own accord, rather than a supplementary flavor or just color garnish for the dish. This is not rocket science or any new revolutionary culinary technique. It’s just my own personal observation, and frankly it’s probably a little late for me to be making this realization, but better late than never. Sometimes we get a little set in our cooking ways, and a small change can make a big difference.

Many of you have asked me about using fresh herbs in meals and how using fresh herbs differs from using dried herbs, so I thought I’d take a little time to talk about herbs. There are two main rules to using herbs in your cooking.

Rule #1: dried herbs should be added to foods at the beginning of cooking so there is time for the flavor to be released, while fresh herbs should be added at the end so that their flavor remains bright and doesn’t disappear.

Dried herbs are dried (obviously!) and need some time to re-hydrate and release that flavor. Consequently, you should use dried herbs when your cooking technique takes some time and involves some liquid. Chilis, stews, braises, soups - these are all dishes that could use dried herbs, added at the beginning of the cooking process. Fresh herbs tend to have a cleaner, more pure and brighter flavor, but this flavor is delicate and can be completely cooked away if the herbs are added at the beginning of cooking. For instance, I love cilantro added to chili, but only at the very end, right before serving.

Rule #2: when converting from dried to fresh herbs in a recipe, you should use four times as much fresh herb as dried (AND you should add it at the end of cooking, rather than at the beginning).

Just like dried fruit, dried herbs have a very concentrated flavor, so you can use a lot less. At the same time, their flavor can become stale. We all keep our herbs and spices way too long. Often, we even relocate our home and pack our dried herbs and spices to take with us! Generally, dried herbs and spices will last for six months before they lose their impact. I’m not saying you should throw all your dried herbs out (although, you really should throw all your dried herbs out), but I am suggesting that you purchase herbs in smaller quantities and replace them more frequently.

Aside from the two main rules, you still might be wondering about what herbs to put with what foods. I generally think about the ethnicity of a dish and add herbs that are common to that cuisine. For example, Italian cuisine uses a lot of oregano, parsley, basil, rosemary, and sage. Greek food includes a lot of dill, oregano, rosemary, and mint. French cuisine incorporates a lot of parsley, basil, rosemary, thyme, tarragon, lavender, and sage. Asian herbs include cilantro, lemongrass, and Thai basil. If you know the type of cuisine you’re cooking, which herbs to use comes pretty naturally and you really can’t go wrong.

Of course, there are some classic food-herb combinations. Here is a little list of suggested herb-food pairings. It certainly is not exhaustive, but it might give you a little idea of how to use different herbs.

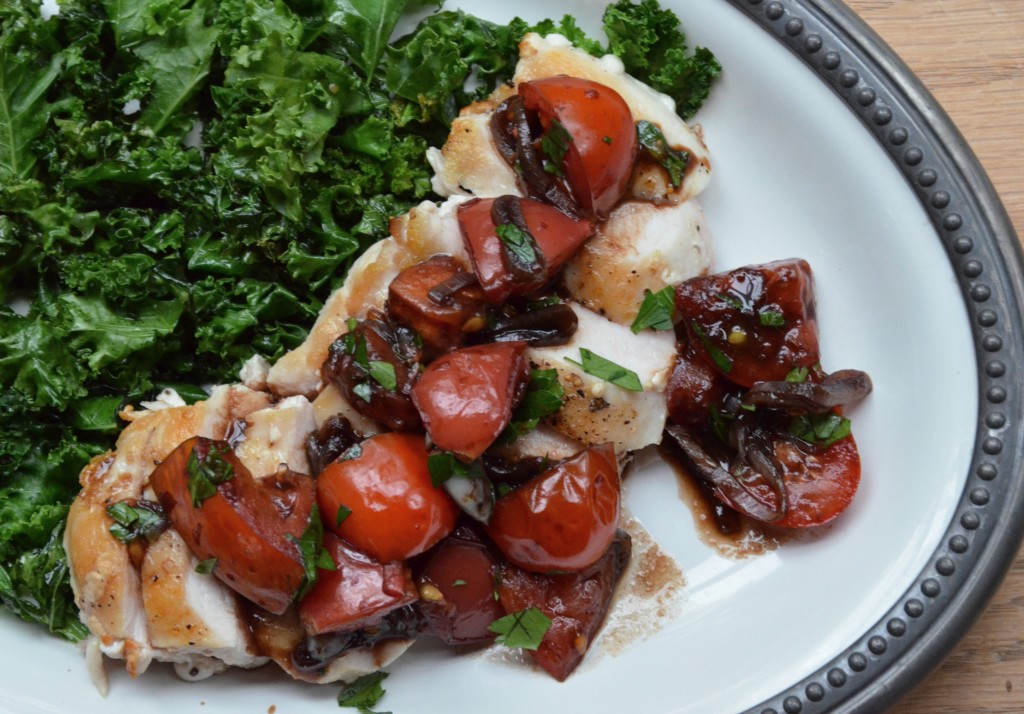
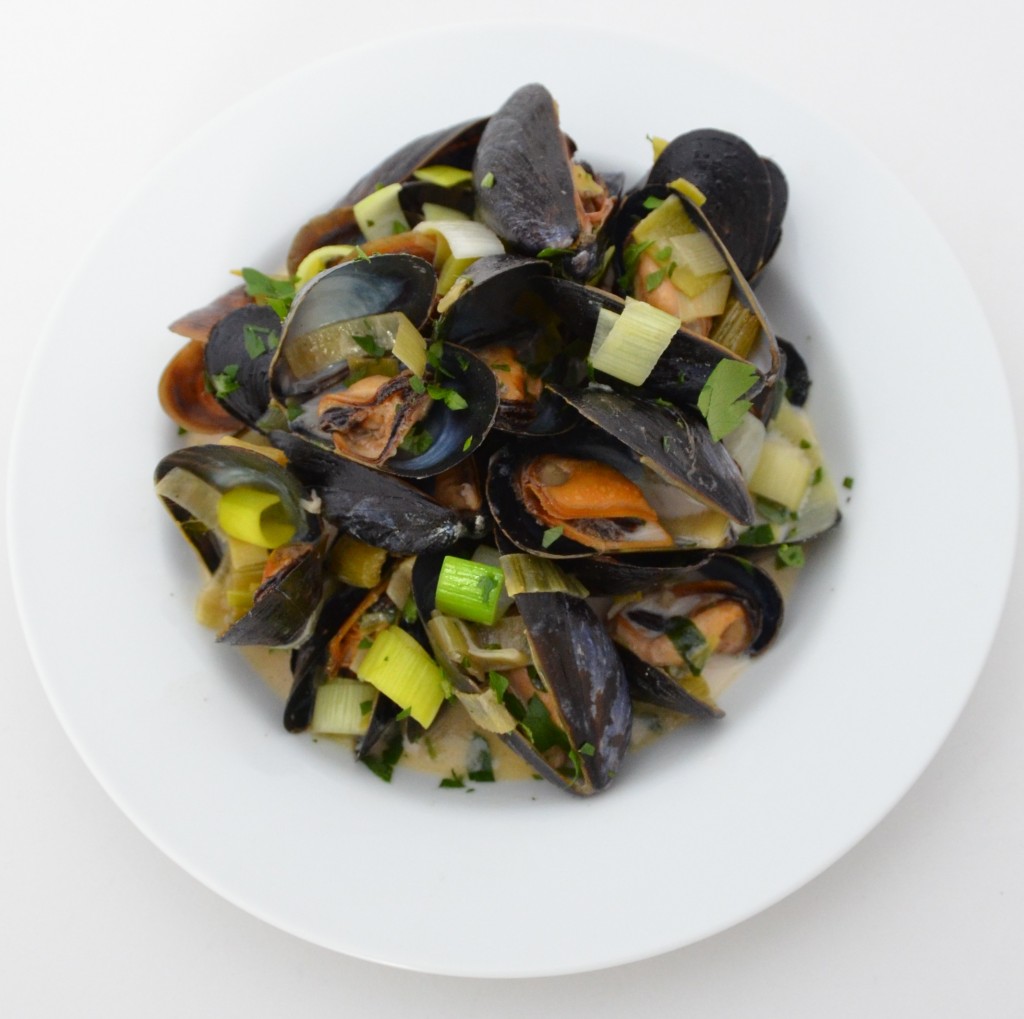
Parlsey: almost anything that you want to give a fresh grassy note to; soups, butters, pastas, eggs/omelets, lentils, beans… really anything

Sage: squashes (like butternut, pumpkin), poultry, beans (white beans), lamb, stuffing, apples, goat cheese

Chives: potatoes, eggs, goat cheese, anywhere you want a mild onion flavor

Rosemary: potatoes, lamb, chicken

Thyme: chicken, fish, vegetables

Basil: tomatoes, pesto

Tarragon: salads, fish, potatoes, chicken, anywhere you want a slight licorice/anise flavor

Dill: potatoes, goat cheese, fish, shrimp

Oregano: chicken, pizza

Cilantro: curries, salsas, chilis

Mint: lamb, potatoes, tea

Really, the best way to learn about herbs, where to use them, and how much to use is to do exactly what I did - use them! The beautiful thing is you can learn something new every day!

Oct 022011
 

We move quickly in this day and age. We’re working, rushing from place to place, busy going from one thing to the next. Stopping or slowing down just enough to make dinner sometimes seems like a hurdle too high. In fact, I heard recently that the average working mom is willing to spend 12 minutes making dinner. 12 minutes?! That’s just not right. I take time to cook meals because I enjoy it, but I rarely slow down enough to really do something that isn’t on my to-do list. The other day, however, I did just that and it felt really… really good. So good, in fact, that I plan to do it again soon. It only took me an hour and at the end I felt like I’d learned something, experienced something new and got to eat the end result. I made fresh mozzarella cheese.

It may sound impressive, but it really couldn’t have been easier, especially since everything I needed was in this cool mozzarella cheese-making kit from Roaring Brook Dairy - a thermometer, a pair of latex gloves, cheese salt, citric acid and a tablet of rennet (enzymes that help coagulate the milk, separating the curds and whey). The only ingredients I had to supply were a gallon of milk and a bottle of water.

The instructions included in the kit were great - accurate and easy to follow, but here’s how to make mozzarella in a nutshell. The first step in the process was to dissolve the rennet and citric acid in two separate containers of bottled water. Easy enough. Then slowly heat a gallon of pasteurized (but not ultra-pasteurized) milk to a temperature of 85 degrees F.

Gently stir in the citric acid. Continue to heat the milk until it reaches 100 degrees F and add the dissolved rennet. Stir gently in an up-and-down motion for 30 seconds (bringing your slotted spoon out of the milk and putting it back in - stirring vertically, if you will). Continue to heat the milk until it reaches 105 degrees F and then let it sit, covered for 10 minutes. At this point, the curds will have separated from the whey. You can check the readiness of the curds by pressing a teaspoon into the curds - it should leave a dent.

Press the back of a teaspoon into the curds...

...it should leave a dent if the curds are ready to strain.

Remove the curds from the pot with a slotted spoon (I used a tool called a spider which was perfect) and place them in a colander, straining as much of the whey out as possible and even pressing on the curds to release more of the watery whey.

The Prepology silicone colander makes squeezing the curds easy.

Once you’ve separated as much of the whey as possible, microwave the curds for a minute. Then, using gloves to protect your hands from the heat, fold the curds over on themselves to distribute the heat and squeeze out more of the whey. Heat the curds again for 30 seconds or until the curds are about 135 degrees F. Fold the curds over on themselves again, kneading the cheese until it becomes shiny and stretchy.


Then, add the cheese salt, sprinkling it over the curds as evenly as possible and stretch the dough, pulling it apart and then folding it together again.


A gallon of milk will make two large mozzarella balls, so divide the curds into two pieces (or more if you want to make smaller mozzarella balls). Shape the balls by stretching the cheese over itself, pinching it into a knot at the bottom. Once formed, pop the mozzarella balls into ice water for few minutes and then wrap in plastic wrap. Done.

It was easy. It was relaxing. It involved a lot of waiting for the right temperature or letting the curds sit and coagulate. Believe it or not, it was really peaceful. Even the dogs lay down in the kitchen and slept. At the end, I was able to make a beautiful Caprese salad with tomatoes and fresh basil, balsamic vinegar and extra virgin olive oil, and fresh…really fresh… mozzarella cheese. And the little knot of cheese that was left after pinching the curds into a ball… well, that went to a relaxed, peaceful and yet attentive kitchen helper.

You can learn more about Roaring Brook Dairy here. Their cheese-making kit would make a great gift for a food-lover and would be a really good project for young adults. Check them out.

Feb 022006
 

I am told that as a child, I would go grocery shopping with my mother and “tidy up” the store while she shopped. I would return misplaced or abandoned items to their rightful homes and make sure that all the labels were facing outwards for the customer to see properly. Had my mother been a little more entrepreneurial, she might have rented me out, for there are companies who actually pay people to do such work for their product, and clearly, I had talent. Instead, she just kept moving up and down the aisles while I made sure that everything in her wake was in order.

I’m quite sure this little childhood story comes as no surprise to those who know me now. Given my somewhat “overly organized” personality, it is entirely believable. I can live in someone else’s mess for a little while, but in my own world, I like things to be where they are supposed to be. After all, if whatever you’re looking for is in the right place, it is easier to take the next step in doing whatever you happen to be doing that involves whatever it is you’re looking for, no? For instance, if your keys are on the hook right near the door, it is easier to leave the house and lock the door behind you – you don’t need to stop and spend time looking for your keys.

In my overly organized fashion, I like to apply this concept to almost every aspect of my life, and cooking is no exception. Indeed, when cooking professionally on a line, organization is critical. Without structure, the whole kitchen would fall apart. The restaurant line is only as good as its weakest link, and with emotions as raw as they can be in a restaurant kitchen, you do not want to be the weakest link.

At home, preparing the evening meal is usually a solo performance. In most cases there’s no-one else working with you, relying on your effort in order to pull the meal together. Consequently, the home cook should feel a little more relaxed. Why then, do so many people feel stressed out about making dinner, especially when entertaining? The most common answer to this is timing. The home cook has to prepare all parts of a meal themselves, and needs to time those different components to be ready simultaneously. Therein lies the challenge. But more than that, the home cook wants all parts of the meal finished pronto, with no time put into them at all.

So, how can one make timing the meal easier and reduce the stress on the cook? I’d like to argue that being organized is the first step. Mise en place is something that every professional, and many home cooks, understand. It translates from French as “to put in place”, and refers to doing all your preparatory work before actually cooking – chopping what needs chopping, measuring what needs measuring, etc… It is a standard procedure in restaurants and commercial food settings, and for years has been something that I’ve preached to the home cook. Why? Well, it prepares you to cook, prevents last minute rushing and panicking, and facilitates timing parts of the meal. It simply makes the cooking process so much more enjoyable. At least… that’s what I think. But then, I enjoy cooking in general, and as previously stated, I thrive on organization.

But what about all those people for whom cooking at night is a chore, a burden? What about those people who like to fly by the seat of their pants and just get a meal on the table? Will doing their mise en place before they cook help them, relieve them of stress and allow them to enjoy the process? Having given this some thought, I think that unfortunately mise en place will only frustrate and add to their nightly burden, for despite the fact that the ingredients prepared for a meal can look delightful in little bowls or even little piles on a cutting board, the big drawback is that preparing mise en place definitely takes time. It is hard for me to accept this. It is difficult to think that not everyone in the world enjoys food preparation and eating the way I do.

In her latest cookbook, Sara’s Secrets for Weeknight Meals, Sara Moulton touches on this subject. In her introduction, she describes her disappointment in learning that most people these days seem to want to prepare dinner in fifteen minutes or less. “Fifteen minutes?!” she writes, “What’s the big rush? Cooking is fun. Cooking is therapeutic. Cooking is creative. Cooking concludes with a wonderful meal that brings the whole family together.” Still, she succumbs to her readers. This cookbook is a good compromise between someone who is truly a cook at heart, and the general hungry public. She provides 200 recipes that will satisfy your culinary creativity, but can be completed in thirty to forty-five minutes. In order to accomplish this, she’s done away with the concept of mise en place.

“Technique–wise, I’ve dispensed with what the French called mise en place … That’s a smart way to go for a restaurant chef, who has to cook hundreds of dishes to order on any given night. But it’s definitely not the fastest plan for a home cook, who can certainly wait to chop up the garlic and peppers while the onions are browning.”

Reluctantly, I guess I have to agree with Sara, but I’m not happy about it. I don’t want to get off my mise en place soap box. I often find the preparation of ingredients as enjoyable as the actual cooking, but I do understand that not everyone has the luxury of the time it takes to do this, and many would probably rather be watching Law & Order. AND, I have to shyly admit that I too, usually do my mise en place in stages, so as to be as efficient as possible (there’s that overly organized part of me again!). I’ll concur that on a weeknight, when cooking for the family, mise en place is probably not necessary, but I will remain true to the premise that if you want to reduce stress and facilitate timing when entertaining, advance preparation is essential and will ease your tension.

Having softened on my quest for universal kitchen readiness, I’ve created a compromise of my own. I’ve decided that I will now consider my pantry, my refrigerator, my overall food inventory, to be my mise en place. After all, if my cupboards are in order, and I know what lies behind their doors, I’m prepared to not only cook my meal, but do my grocery shopping, AND it leaves room for more creativity, knowing what is there to throw into a meal at the last minute. Not only that, but now I can browse through my pantry and return misplaced or abandoned items to their rightful homes and make sure that all the labels are facing outwards. You see how this works? Now I can satisfy not only my overly organized personality, but the child inside as well.